How to make flowers from sausage balls step by step. How to make a flower out of balloons
A flower made of long sausage balls is one of the most popular figures in twisting. And this is no coincidence. The beauty, ease of creation and small number of balls used made this figure a favorite among both those who create it and those who are connoisseurs of this wonderful toy. One cannot fail to note its versatility. Balloon flowers have always been welcome “guests” at children's parties and matinees. Adults also quite often use balloon flowers as interior decorations, creating an unforgettable playful holiday atmosphere. In addition, this original figure will be a wonderful comic addition to any gift.
We showed how to make a flower with some additions. The flower core can be made a little differently. By making a small change in the design, you can achieve a significant difference in the appearance of the figure. When starting work, do not forget that twists should only be done in one direction.
We will need:
- 3 ShDM (balls for modeling),
- Hand pump for balloons.
Difficulty of the figure: low
How to make a flower from balloons with your own hands
There are three sausage balls in front of us different colors. It is recommended to take one of the balls green - it will become the stem of the flower. The other two are the core and the petals. In this case, yellow and orange are used, respectively. Everything is limited only by the twister’s imagination. 
We inflate the ball, which will become the petals of the composition. The ponytail must be left uninflated. This way, during modeling, there will be room to move the air so that the “sausage” becomes less elastic and more pliable in twisting. In addition, we have to connect the tail with the beginning of the ball. 
We tie the end and beginning of the ball together to form a circle. 
Without putting the pump far away, we inflate the trunk of the future flower. We also leave a small tail. It is necessary to leave literally a couple of centimeters, since the leg does not require large quantity twist. If you leave a large tail and subsequently distribute the air throughout the trunk, the leg will not be too elastic.
For the sake of the future core of the flower, you will have to sacrifice the whole ball. To do this, inflate the sausage ball and pinch the end of the ball to make a small ball. Then we cut off what is unnecessary with an eye to the fact that it is still necessary to tie the future core into a knot. After tying the knot, we are in no hurry to cut off the excess. Next, the future middle of the flower will need to be connected to the trunk. The photograph shows not one, but two cores. But more on that a little later. 
Let's return to the main part. We twist the previously obtained circle from the sausage ball so that we get two twists. To do this, we make several turns with both hands. 
Mentally divide the figure into three parts and twist one third part of the figure as shown in the figure. 
We make a second twist to obtain three equal parts of the figure. 
We fold the parts as shown in the picture. 
We twist the result into one single twist. 
Most of the work is done. The result was petals. 
At this stage, we will consider options for creating the core of the flower. The first classic version of a previously created core may seem unfinished. To obtain the desired result, you need to press your index finger on the not yet cut off end of the inflated ball and only then cut off the excess. It is worth noting that it is not possible to bring the already finished center of a flower into this form. Due to the high pressure in a small figure, pressing with a finger will not achieve the desired result.


So, by making a very small change in the technology of creating a flower from a ball, you can get a completely different appearance. In our opinion, the second option is much more presentable.
Having chosen the most suitable method, we tie the stamen to the trunk of the flower with a simple knot. Then, pulling the core away from the trunk, where they are connected, we carefully push it through the petals on the side.
Then we make the petals. We twist the trunk with the expectation that the twisted part will split into two petals. 
We divide the twisted part into two equal parts. 
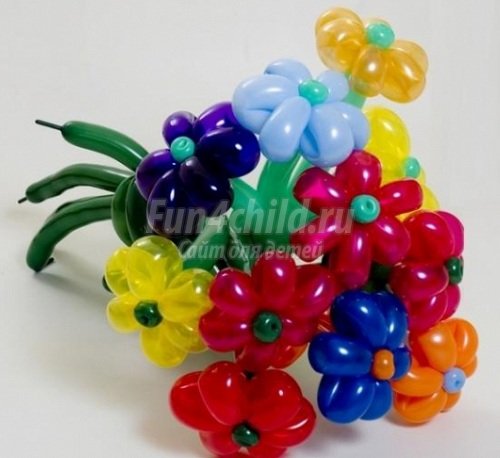
If you learn how to make flowers from balloons, you don’t have to worry about the decoration of absolutely any gift. Everyone, both adults and children, associate bright, colored balloons with joy, fun, and a real holiday. But it’s one thing to give an armful of colored balls, and quite another to master the difficult science of modeling, which is called twisting. With this technique you can do the most different figures, in particular flowers, which are the subject of our article today.
How to make a flower from a balloon
Until you know how to make a flower from a balloon, it all seems very complicated. There is a stereotype that balls are a very fragile, capricious material that is not easy to work with. In fact, there is an abyss between the rubber balls from our childhood and the special modeling balls from which we will collect air bouquets. Modern materials and technologies make it possible to create flexible and durable balls, the shapes of which, even filled with ordinary air, retain their shape for a very long time. Of course, this does not mean that several of them will not burst during training, but you should perceive this as inevitable losses on the path to mastery, and soon you will be able to create, weaving many elements into one bouquet.

We leave complex garlands aside and learn how to form a bouquet, how to do. Ball of flowers will be an excellent gift for a birthday or wedding; flower arrangements will help decorate the interior for the holiday, become part of the composition, and unusual flower can be made to participate in a DIY craft competition. To make crafts, you will need to buy a set of modeling balls (you've probably seen them in the store, these are long sausage balls), small round balls, heart-shaped balls (great not only for decorating themed crafts for Valentine's Day , it is also used for the formation of unusual flower cores). You will also need a special compact pump for inflating the balloons, because inflating long balloons on your own is extremely difficult. As auxiliary materials, you also need to buy tape for attaching various elements into a single whole and a marker with which you can draw on the balls, adding the necessary touches.

Balls come not only in different sizes and different colors, but also in different textures. Most often, all balls are either matte, pastel, or transparent, which are called crystal, or balls with a metallic sheen. For each new bouquet, you can use balls of different textures and get new facets even in familiar compositions. Remember that most modeling balloons are quite dense in themselves, which makes the twisting process easier, but, unfortunately, such balloons, even filled with helium, will not be able to fly into the air.
How to make flowers from balloons photo

Let us continue to comprehend the theoretical foundations of how to make flowers from balloons. Photo The various beautiful aerial bouquets you see in this article should inspire you to create something similar with your own hands. You need to practice inflating long balloons. This should not be done completely, leaving some part of the tail unfilled. This is necessary so that when twisting, air can move and be distributed between the twists. The more nodes there are in your planned flower, the more space you need to initially “reserve” for them in the volume of the ball. Among the main twisting techniques are the bubble (twisting the ball in half), the lock (twisting three bubbles at the base), and the ear (twisting a large and small bubble).

After you have thoroughly studied the theory, it is time to put your knowledge into practice. It is best, since we are just beginning to master this difficult science, to use special kits with balls for modeling. They are a package with multi-colored balls selected by size, as well as instructions on the stages of twisting and, in fact, an illustration of the finished craft. If you don’t find such sets on sale, but only see the balls themselves, then don’t be upset, because you can find lessons on the Internet on how to how to make a flower ball, master class on aerodesign and other interesting things.
How to make a flower from a balloon idea
In order to learn, how to make a flower from a balloon, ideas may be different. You can start with the simplest thing - a daisy made entirely from modeling balls.
Other news
A balloon is an invariable attribute of the holiday. Any birthday is not complete without decorations made from colorful balloons. Today we will tell you how to make flowers using balloons.
Getting ready
Take a thick piece of cardboard and cut out 2 circles in it, the first with a diameter of 10 cm, and the second with a diameter of 15 centimeters. In the future, these parts will be used for templates or holding “flowers”.

Inflate 5 balloons of the same color (you can use balloons of 2 colors). Balls inflated in this way should fit into a hole with a diameter of 15 cm.

Now take more colorful balls, inflate them, they should go into the 2nd hole (with a diameter of 10 cm). Using these balls we will make the center of the flower.

Making a flower
To begin, tie 2 large balls together. You can use thread or wire. The remaining 3 large balls are also tied together.


Having received 2 bundles of balls, connect them so that they protrude in one direction.

The balls that are used to create the center of the flowers are tied together so that they face in opposite directions.

Connect 2 groups of balls as shown in the picture. You will get a “flower”.


If you have also created a “stem”, you can connect it with the “flower”, resulting in a solid figure. You can use a painted wooden dowel for the stem.

Making chamomile

Take balls of 3 colors (white, green and yellow), which have an oblong shape.
Further steps are similar to the previous ones for an ordinary flower. The only difference is that you need to tie the balls in the middle.
Making a flower from a balloon
For such a flower, we will need 2 multi-colored balls and a hand pump.

The ball should be taken in an oblong shape. Inflate the balloon and tie it at the end, leaving 3 cm. We connect the balloon into a ring and bend it in the middle. We will get 2 “sausages”. We divide each of them into three parts, twisting both parts at each division point. We fold them into an accordion, twisting them at one point. The result is the “petals” of a flower.

Take 1 more ball of a different color (preferably green). We inflate it and fold one of its ends into a “ball” - this will be the “top” of the flower. We twist it with “petals”, make a twist in the middle of the stem and get “leaves”. The flower is ready.

Video lessons
A bouquet can be an unpredictable surprise for any child. But it should not be made from ordinary flowers, but from balloons. Such a gift can be given for some holiday or just to please your baby on an ordinary day. But a bouquet of balloons can also be a pleasant gift for an adult.
Selection of materials for daisies
Before figuring out how to make a flower out of a ball, you need to figure out what you will need for this. So, there are several options for making bouquets. The most common are flowers made from “sausages”.
When using long balloons, it is advisable to immediately purchase a pump with which you can inflate them. In their production, fairly dense rubber is used, so it will be difficult to fill them with air without special devices. By the way, if you have a regular bicycle pump, then you can safely use it. It is also important to plan how many flowers you will make. Based on this, the required number of balls is calculated. So, to create one flower you will need 2 “sausages”, one of which should be green - for the stem, and the second - any other (you can focus on pink, red, yellow or even blue options).
Materials for flowers from round balls

But to create festive mood It is not necessary to run to the store and look for special long inflatable “sausages”. If you have ordinary small round products at home, then you can safely use them. In order to make a flower from balloon, you need to do the following. Take 5 pieces of one color for the petals and 2 more of another to create the core. You can inflate them with your mouth or with a regular bicycle pump. In addition, to create such flowers you will also need to stock up on cardboard and scissors. True, if you have small balls with a diameter of just over 10 cm, then you will not need additional equipment.

Making daisies
If you have a long “sausage”, then you can start to figure out how to make a flower out of a ball. Completely inflate the pre-purchased product, which is intended for making petals. After this, deflate the air for 1-2 seconds to make it softer. Now you can get to work.
Chamomile is made as follows. From the inflated ball, which should have a tail about 3 centimeters long, a circle is made by tying its two ends. It is also necessary to bend it in half and twist it twice. Visually divide the two halves into three parts and secure each of them. To do this, twist the ball twice at the same distance. Now you have a sausage blank for the petals.
There is very little left to finally figure out how to make a flower out of a ball. The scheme for further work looks like this. Take the workpiece from both edges and squeeze it so that it folds like an accordion. Twist the joints. Please note that if you inflate the balloon too much, then at this moment it may simply burst. If everything went smoothly, then you can safely straighten the petals, your base is already ready.
Chamomile stem
Having made cute flower petals, you can begin further work. To do this, you need to inflate the balloon for the stem. It is desirable that it be green. In order to make a flower from sausage balls, you need to understand how a tulip is created for the chamomile core. To do this, press the neck inward with your finger. With the other hand, the ball is compressed and twisted so that the concave part is secured inside.
After this, the green sausage is inserted between the petals of the chamomile; the tulip made should become its core. The next step is to create leaves on the stem. To do this, a clamp about 7-10 centimeters long is made on its free part and twisted with a lock. The second symmetrical leaf is also created.
With the help of such simple manipulations one flower is made. You can create a whole bouquet in the same way. But note that daisies can be made not only from “sausages”.
Flowers made from small round balls

Those who want to be more original do not have to go to the store for long “sausages”. You can take ordinary balls and a cardboard blank, in which you need to cut two holes with a diameter of 15 and 10 cm. They are necessary to create products of the same diameter; the sizes of the petals will be checked against them.
In order to make flowers from balloons, you first need to inflate them. After this they need to be twisted. Five inflated balloons are connected like this. At the beginning, 2 pairs are made. An additional ball is screwed to one of them. As a result, you will have 2 twists, one of which has two and the other three petals. They must be connected to each other by twisting the bases several times. But this is not a finished version yet, just petals. Now we need to make another core.
To do this, you need to inflate two balls, their diameter should be smaller than that of the petals. To check their size, use a cut-out ring in cardboard with a smaller diameter. Having inflated two small balls, the colors of which are different, you need to connect them with the petals so that they are located in the center of the created flowers.
After this, you need to straighten the balls so that the created flowers become double-sided. That is, the petals should go in a circle, and the core should be located in the center. To do this, the two middle balls must be placed opposite each other.
But figuring out how to make a flower out of a ball doesn’t end there. If necessary, you can attach a leg to it. The technology for its production is almost the same as for chamomile. The only difference is that she does not need to make a tulip-core. Such a stem is screwed with its free end to the petals, and leaves are made from its long part using the technology described above. By the way, if you make a chamomile on a stem, then there should be only one core.
Options for sausage products

If you have figured out how to make a daisy-shaped flower from a ball, then you can proceed to more complex options. Professionals make spectacular tulips from them. To do this, two balls are used at once - red and green. They are tied together and twisted alternately.
More experienced twisters can even make roses or lilies. Such a gift will be appreciated not only by children, but also by adult women. If men present their fair half with such a bouquet made with their own hands, they will delight their ladies beyond words.
Balloons can not only be a decoration for a holiday, but also great entertainment for both children and adults. You can make various figures from them to surprise your loved ones, besides, such decor at the celebration will look much more interesting. One of the simplest products are flowers made from balloons, which can be collected into a bouquet and presented as a gift.
 Before you start making balloon figures, you should familiarize yourself with some rules for working with them to make the task easier. Those who are doing this type of modeling for the first time should first do it while sitting at a table. It must have a flat surface so that nothing rolls off it, and be absolutely clean, otherwise the inflated balls may burst from dust.
Long modeling balloons are quite difficult to inflate with your mouth, so it is better to purchase a pump to work with them. You can use the usual manual version for a bicycle.
It should be remembered that the balls can burst at any time and cause injury, so they need to be kept away from the face. You should not be overzealous with inflating them, otherwise the material may crack when twisted. Also, don't try to twist round balls because that's not what they're designed for.
Before working with such capricious material, you should wash and degrease your hands well. In addition, before making balloon flowers, you should remove all Jewelry, having sharp edges so as not to accidentally damage the craft. It is advisable to cut your nails short, and if you have long hair they should be taken back.
It is better to wear light-colored and non-staining clothes, since there is talc inside the modeling balls (modeling balls), which can stain a dark dress or trousers. Clothing should be comfortable, as sometimes items need to be squeezed between the knees.
It is advisable not to place the inflated balloons on any surfaces, otherwise they may be damaged. It is better to put them on your own lap or hold them in your hands. When twisting the ShDM, it is more convenient to perform all manipulations with one hand, since the second one needs to hold the structure so that it does not fall apart.
To make the finished figurine look neat, it is advisable to perform all twists in one direction - either towards you or away from you. If the balloon turns out to be very inflated, you can release some air from it, but if it is filled with oxygen too much, you will have to take new material. It is not recommended to re-inflate the ShDM, since after the air is released it loses its properties.
If you plan to apply drawings, you should use a water-based marker. Alcohol markers can corrode the surface of an inflatable flower.
simple flower
The simplest version of chamomile can be made from ordinary round balls. This will require 5 pieces of balls white and 2 yellow, 2 sheets of cardboard, thread or wire for fastening the structure. The simplicity of this craft lies in the fact that you don’t have to twist anything, as is the case with modeling other colors from balloons with your own hands. Step-by-step instruction:


You can attach a ribbon to the finished flower so that it can be held in your hands. You can also make a stem for it from a wooden stick wrapped in green cloth or painted in an appropriate color.
Chamomile from a long ball
The flower will be no less spectacular if it is made from SDMM. Before you read the instructions for sausage ball figurines for beginners, you should prepare the necessary materials. To model 1 daisy, you will need a long ball of green and another shade (white, blue, red) at your discretion, from which petals will be formed, as well as a thread for tying the ends. The flower is made according to the following scheme:


You can make a bouquet from these flowers. If you only need 1 chamomile, it is better to form leaves on its stem. To do this, a ring is formed in the middle part of the green ball, which is twisted several times, and opposite it, another leaf is made using the same principle.
Making a rose
 A rose is considered a more complex figure, but it also looks more impressive than previous options. To make it you will need a green grinder for the stem, a red one for the bud, a stick for the balls and scissors. This craft will be a wonderful gift for March 8 or February 14.
To make a flower, a red sausage ball is inflated to a length of 50 cm (this should be the part of the balloon filled with air). Its tip is tied, after which an 8-centimeter bubble is curled around it. Next you need to make 4 such elements. Then they are twisted into a ring. The resulting structure is folded in half 2 times and then fastened together.
Next to this element, on the free part of the ball, 3 bubbles approximately 3 cm long are gradually twisted, which are placed horizontally in relation to the first structure. The remaining end of the ball is then rotated so that it faces sideways, over one of the valleys formed by the 4 bubble element.
Next, a bubble 9-10 cm long is made from the free end of the ball, which is wrapped around a structure of 3 bubbles. Then 2 more similar elements are made, and they need to be placed slightly lower, wrapping the bud. The remaining part of the ball is connected to the lower part of the flower, formed by 4 “sausages”, and secured with them using the tip.
To make a stem, cut off the end of a green ball 10 cm long. It should be inflated, then deflated and put on a stick, completely covering it, and then tie its tail.
The remaining part of the green ball must be tied from the cut side and inflated by about a third of the length. Then 3 small bubbles are twisted on it, after which they are fixed on a stick so that these elements form perianth leaves. You should not place them at the very end of the “stem” - you need to step back about 5 cm from it. The part of the ball free of air is cut off again, and the stick is connected to the flower, for which its upper part is inserted into the middle of the structure of 5 bubbles.
Leaves are made from the remaining piece of green paper. You need to tie one of its ends, then inflate the ball 20 cm and divide it into 2 equal bubbles. They should be twisted several times so that there is a distance of 3-4 cm between them. After this, the bubbles are tied at the ends, the resulting ring is put on the “stem”, and then each element is folded in half and secured, for which it is folded several times.
The result is a rose with 3 small leaves near the bud and 2 leaves on the stem.
Tulip simulation
Another option that can be made from SDM are tulips. These long ball flowers are a little more difficult to model than daisies, but the result is worth it. To do this you will need 1 yellow and green ball. To make a tulip step by step, you need to follow the following scheme:

The result is a tulip. If you are not planning a bouquet of such flowers, you can roll leaves on its stem, which are made in the same way as chamomile leaves.
DIY iris
ShDM makes iris no less beautiful. In terms of complexity, it is about the same as a tulip. To make it you need 2 balls - lilac (or purple) and green. To simulate this flower, you need to follow these steps:

The resulting leaves need to be leveled so that the stem is located exactly in the middle. After this, you need to connect the stem of the flower with its bud by tying a green ball structure to the bottom of the iris.
If you don't succeed the first time, don't be discouraged, because you need to practice a little to understand this technique.
To make the result satisfying, you should start working with balls in good mood and with a lot of patience.


