Embroidery of a rose from a knot and gathered ribbon. How to make simple, French and colonial knots in ribbon embroidery Ribbon knot
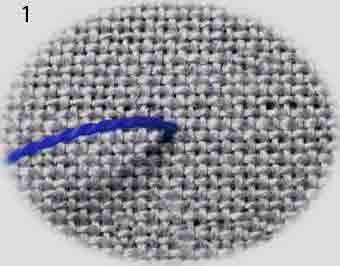
Let's continue our acquaintance with different ways embroidered roses with ribbons. In this “Cross” master class we will learn how to make a rose from a knot and collected ribbon.
In fact, we already know everything we need to know to complete this rosette. These are the sewing basting stitch (or the “Forward needle” stitch) and the Simple knot or Colonial knot.
A basting stitch, combined with one of these knots, simply turns into a marvelous rose.
The volume of the rose, i.e. the number of petals, depends on the length of the ribbon, but all your basting stitches should be the same, as well as the distance between them.
The diagram below shows the progress of the work:

And now, in fact, a master class on embroidering roses with ribbons for beginning craftswomen.
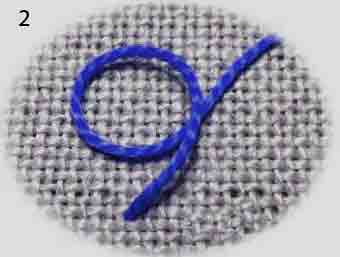
And we bring it to the face.

At a distance of 5-7 cm from the fabric, we wrap the ribbon around the tip of the needle to form a Simple knot or so that a Colonial knot is formed.
It makes virtually no difference which knot you make. Maybe the middle of the rose, made with a Colonial knot, looks a little more interesting.
I made a Colonial Knot.

From the knot we make 5-9 basting stitches along the center line of the ribbon. The length of the stitch should be approximately equal to the width of the ribbon.

Near point A, we pull the tape to the wrong side, gradually pulling it from the wrong side.

If the tape is larger than 5 mm, then difficulties may arise at this stage. You can help yourself by holding the knot with your fingers and using rotational movements, slowly, to help the needle pass through the knot. Then the knot will pass through the tape quite easily.
We continue to pull the ribbon until the ribbon folds into petals with a knot in the middle. We fix the ribbon on the wrong side and straighten the petals with a needle. Our rose is ready.

Step by step photos completed Irina Shcherbakova.
Video on how to make a Rose from a knot and assembled ribbon from Natalia Frolova
And several works in which needlewomen used such roses.
Rococo knot - loop stitch

1. Bring the tape to the right side at point A at the base of the seam.
2. Pass the needle to the wrong side to the right of point A and bring it out at point B. The ribbon should be to the left of the needle.
3. Pass the tape under the point of the needle from left to right.
4. Thread the straightened ribbon onto the needle clockwise.
5. Pull the ribbon to wrap around the needle, but do not pull it too tight.
6. Repeat steps 4 and 5 to complete the required number of turns. The ribbon wrapping around the needle should be straightened.
7. Hold the thread with your finger and pull the needle, loosening the threads to pass the eye of the needle (finger not shown).
8. Pull the ribbon until a tight rococo knot is formed at the end of the loop.
9. Pass the needle to the wrong side just behind the knot.
10. Pull up and secure the tape. The combination of the rococo knot and the loop stitch is complete.
Colonial knot

1. Bring the tape to the front side where the knot is made.
2. Keep the tape loose. Place the needle on top of the tape.
3. Pick up the ribbon with a needle where it comes out of the fabric.
4. Using your left hand, pass the ribbon over the needle. Shorten the loop around the needle.
5. Wrap tape around the point of the needle. The ribbon forms a figure eight around the needle.
6. Pass the point of the needle to the wrong side, stepping back from where the tape comes out by 1-2 threads of fabric.
7. Pull the ribbon tight around the needle and begin to pass the needle to the wrong side.
8. While pulling the ribbon taut, continue to pass the needle to the wrong side through the knot.
9. While pressing the knot and loop into the fabric with your thumb, continue to pull the tape up (finger not shown).
10. Colonial knot is completed.
Pleated rose
To make such a rose, a double-sided satin ribbon is more suitable, but for clarity, a single-sided ribbon and a contrasting thread were used.

1. Fold the ribbon in the middle at a straight angle. Hold the fold.
2. Fold the bottom half of the ribbon up at a straight corner. The fold is at the edge of the tape. Press her.
3. Fold the bottom half back up so that the fold is at the edge of the ribbon. Press her.
4. Repeat steps 2-3 seven times (i.e., wrap the ribbon up 14 more times).
5. Pinch both ends of the tape with your fingers and release the folds.
6. Holding the ends of the ribbons, begin to tighten one of them.
7. Continue pulling the end of the tape until a rose is formed and the folds move toward the base of the flower.
8. Connect both ends together. Pass the needle through the ribbon at the base of the rose and tighten the thread.
9. Bring the needle up from the base through the center of the rose. Make a small, invisible stitch and bring the needle back through the center to the base.
10. Pull the thread and wrap tightly around the base of the flower 3 times.
11. Pass the needle and thread through the base and secure. Trim off any excess tape.
12. Using the same thread, secure the rose to the fabric, making small stitches through the ends of the ribbon and the base. The pleated rose is finished.
Consolidation
To secure the ribbons, many different stitches are used. Our choice depends on whether you want to decorate the ribbon or simply attach it to the fabric.

1. Tape location. Bring the fly to the front side.
2. Straighten the fly with a needle.
3. Place the tape on the fabric in the desired direction. Use a pin to catch several strands of fabric under the ribbon.
4. Secure a pin over the ribbon, catching several strands of fabric on the opposite side.
5. Continue securing the ribbon in the same manner, placing pins at small intervals.
6. Having secured the ribbon with pins, pass its end to the wrong side.
7. Secure the edge of the ribbon with the last pin. Pin with your chosen stitch, removing pins as you get closer.
8. Fastening is complete.
9. The ribbon is secured with French knots.
10. The tape is secured with a herringbone stitch.
11. The tape is secured with a spot seam.
12. The tape with bends is secured with a spot seam.
French knot

2. Pull the band while holding it in your left hand. Place the needle under the ribbon 1.5 cm from point A
3. While tensioning the tape, bring it under the needle towards point A.
4. Wrap the needle with tape 1 time.
5. Place the point of the needle on the wrong side, close to point A, and slide the tape toward the fabric.
6. Pull the ribbon to slightly tighten the knot. Do not tighten it too tightly, otherwise it will be difficult to get the needle through.
7. Pass the needle to the wrong side and begin to carefully pull up the ribbon.
8. Continue pulling until a small knot forms in the fabric. The French knot is complete.
Gathered ribbon flower
The number of petals of this beautiful flower could be anything. When the ribbon is divided into equal parts, each of them forms one petal - the more parts, the more petals and vice versa.

1. Cut the ribbon to the required length. Mark the intervals with pins.
2. Tie a knot in the sewing thread. Stepping back approximately 3 mm from the end, make small running stitches across the entire width of the tape.
3. At the corner, change the direction of the stitches and sew them along the edge of the tape to the first mark.
4. Change the direction of the stitches again and sew them across the entire width of the tape. Finally, pass the needle to the wrong side.
5. Bring the needle to the right side, retreating 1.5 mm, and continue running running stitches across the entire width of the tape.
6. Change the direction of the stitches and sew them to the second mark.
7. Continue running running stitches in the same manner until the end of the tape.
8. Pull the thread by the knot to gather the ribbon and form the petals.
9. Place the ends of the ribbon with right sides facing each other and sew. Fasten the thread.
10. Distribute the petals and secure them to the fabric by placing small dot stitches around the center.
11. Fill the center with beads or knots. The gathered ribbon flower is finished.
Gathered Ribbon Rose

1. Cut the ribbon long enough to cover the entire flower.
2. Tie a knot on the sewing thread and make small running stitches along the edge of the tape. Leave the thread.
3. Thread the end of the ribbon through a chenille needle. Place the ribbon on the wrong side in the center of the future flower.
4. Using new sewing thread, secure the ribbon to the wrong side. Bring the thread to the front side, next to point A.
5. Start forming gathers to point A and laying the tape.
6. Continue gathering and laying the ribbon in a spiral pattern.
7. Having reached the end of the tape, tuck it down and secure it. Pass the thread to the wrong side and fasten. The gathered ribbon rose is finished.
8. To make a two-color rose, fold ribbons of different widths together along one edge.
9. Place running stitches close to the edge, catching both strips.
10. Repeat steps 3-7 to form the rose. The two-tone rose made from gathered ribbon is finished.
Capture seam

1. Bring the fly to the front side at point A on the bottom side of the bud.
2. Pass the needle to the wrong side through point B, next to point A.
3. Gently pull the ribbon up, leaving a loop on the front side.
4. Bring the needle to the front side at point C on the other side of the bud.
5. Start tightening the ribbon, being careful not to shorten the loop.
6. Pass the ribbon through the loop and begin to carefully pull it towards you.
7. Pull until the loop tightly wraps around the emerging ribbon and rests at the base of the flower.
8. Run the tape to the wrong side at the desired distance from the bud to secure the seam. The "grab" seam is completed.
Ribbon stitch bow
1. Bring the tape to the front side at point A.
2. Straighten the ribbon and pass the needle to the wrong side through point B, next to point A.
3. Pull the ribbon until the loop reaches the desired length.
4. Press the loop into the fabric in the center, above points A and B.
5. Bring the ribbon to the right side above points A and B. Pass the needle to the wrong side under points A and B.
6. Pull the ribbon up, forming a small straight stitch. The bow is finished.

Tape stitch - flower 1
1. Petals. Bring the tape to the front side at point A and straighten it. Pass the needle to the wrong side through point B. next to point A.
2. Pull the ribbon, being careful not to twist it, until a small loop remains on the front side.
3. Press the loop into the fabric in the center, above points A and B. Bring the thread to the right side through the center of the loop.
4. Make a French knot in the center. The flower formed by the ribbon stitch is finished.
Tape stitch - flower 2

1. Petals. Draw a small circle for the center of the flower. Bring the tape to the front side at point A.
3. Holding the tape, fold it towards the center, forming a loop.
4. Holding both layers of tape, bring the needle to the wrong side near point A.
2. Straighten the tape with a needle.
5. Gently pull the tape until a small loop is formed.
6. Holding the loop, bring the ribbon to the right side at point B, being careful not to make the loop smaller.
7. Sew the 2nd stitch, repeating steps 2-5.
8. Holding the 2nd loop, bring the tape to the front side at point C. Make the 3rd loop in the same way.
9. Embroidering in the same way, make the desired number of petals.
10. Cut the ribbon and secure each petal on the wrong side with sewing thread.
11. Fill the center with beads or colonial and French knots. The flower, made with a ribbon stitch, is finished.
Seam loop
Method 1:
1. Bring the ribbon to the right side at point A. Pass the needle to the wrong side close to point A and bring it out at point B. Leave the needle in the fabric.
2. Sew a loop behind the point of the needle.
3. Start withdrawing the needle and pulling up the ribbon
4. Continue pulling until the desired shape is formed. The tighter the tape is, the narrower the loop will be.
5. Pass the needle to the wrong side behind the loop.
6. Pull up the tape. The loop stitch is finished.

Method 2:
1. Bring the tape to the right side at point A. Bring the needle to the wrong side close to point A and bring it out again at point B.
2. Place the ribbon under the point of the needle. folding it diagonally.
3. Point the tape towards yourself.
4. Press the tape with your finger to secure the fold.
5. Gently pull up the tape.
6. Pass the needle to the wrong side behind the loop. The loop stitch is finished.
Ribbon rose

1. Prepare a needle with a matching sewing thread. Make a small knot at the end of the thread.
2. Center. Keep the tape horizontal. Wrap approximately 1.5 cm of tape at the right end at a 90-degree angle.
3. Holding the ribbon in your left hand and the folded end in your right, roll the ribbon tightly one turn clockwise.
4. Make 2 more turns to form the center of the rose.
5. Holding the ribbon firmly, pass the needle and thread through the layers of ribbon at the base.
6. Pull the thread. Sew 2 more stitches through all layers. Leave the needle.
7. Petals. Holding the curled part of the rose in your right hand, bend the top edge of the ribbon back and down.
8. Wrap the folded ribbon around the center 1 time.
9. Take a needle and sew the base of the rose through all the layers.
10. Tighten the thread. Sew 1 more stitch through all layers.
11. Fold the top edge of the tape back and down again.
12. Wrap the folded ribbon around the center 1 time.
13.Pull the thread tight. Sew 2 stitches at the base of the rose through all layers of ribbon to secure the petal.
14. Continue folding the ribbon, wrapping around the center and making stitches until you have the desired size rose.
15. Trim the excess tape, leaving an end about 2 cm long. Fold the tape back and down as in step 7.
16. Fold the ribbon to form a partial petal.
17. Securing the rose. Turn the rose upside down. While pulling the thread tightly, make a few stitches at the base to secure the flower.
19. Trim the end of the ribbon as close to the base as possible, being careful not to damage the stitches.
20. The rose, made of synthetic tape 15 mm wide, is finished and can be attached to fabric.
18. Cut the thread.
21. Roses are made of silk ribbon 7 mm wide.
22. Roses are made of synthetic ribbon 12 mm wide and chiffon ribbon 20 mm wide.
23. Roses are made of silk ribbon 15 mm wide.
24. The rose is made from hand-painted satin ribbon 35 mm wide.
Seam "Plume"

1.Pass the ribbon from point A to point B. Pull the ribbon by adjusting its tension with the free needle.
2. Pull the tape until the desired size loop is formed.
3. Straighten the loop and hold it. Bring the needle to the right side through the previous stitch at point C, above point B.
4. Pull up the tape. Make the 2nd stitch in the same way.
5. Continue embroidering, making the required number of stitches. Make the last stitch flat. Secure the mite to the wrong side. The plume seam is finished.
In this lesson we will learn how to make knots, which are often used in ribbon embroidery. Flower cores, berries, small roses, etc. are embroidered with knots. Its shape and volume depend on how the knot is made.
For those who want to learn ribbon embroidery, the master class will help you master a simple, French, colonial knot, as well as a twisted “ingot” knot.
Simple knot


French knot


Remember, the more ribbon you wrap around the needle, the larger the knot will be.
Twisted ingot knot with chain stitch


Step by step photos - Olga Ivanova (Olga)
This way you can embroider unopened flower buds or leaves.

The flower cores in this work are made using knots
The colonial knot is a bit similar to the French knot. The difference between them lies in the way the thread is wound onto the needle. Just like the French Knot, the Colonial Knot can be used to fill the center of a flower, used to embroider lilac or mimosa flowers, fill an empty fragment in a motif, or use it as a small rose.

For the Colonial Knot, you do not need to use a wide ribbon. When embroidering with a wide ribbon, the knot will turn out bulky and unsightly. It is best to take a tape with a width of 0.5 mm - 1 cm, with 0.5 mm being preferable.
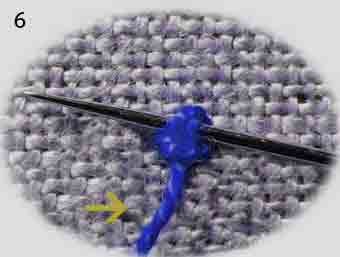
We fix the tape in any convenient way and bring it to the face in step 1.

Now you need to do the winding. It, unlike the French knot, is made around a needle in a figure eight. Place the needle under the ribbon from left to right:

Now we take the tape and wind it counterclockwise in a figure eight.


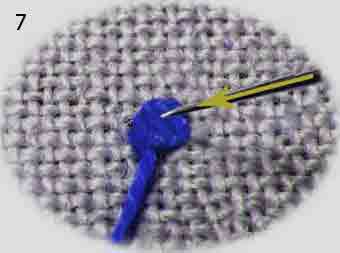
Insert the needle into the fabric next to point 1 at point 2

You should not overdo it here. The tighter you pull it, the more difficult it will be to pull it through.

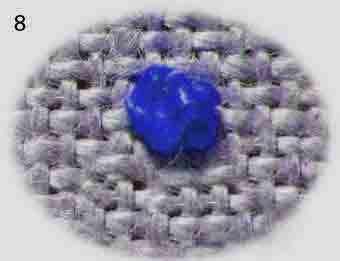
We drag the needle to the wrong side and get a Colonial Knot.

Below is a schematic of the Colonial Knot. Here you can clearly see that the winding is done with a figure eight:

Winding can be done in any direction, that is, if at the first stage we wind from left to right, then the next movement is against clockwise. And if at the first stage the winding was done from right to left, then the next movement By clockwise.
Video tutorial on embroidering Colonial and French knots from Maria Perminova.
Knots on the Snowman
French and colonial knots give the embroidery a special beauty.
They can be the main element of embroidery or highlight some part, creating volume against the background of the entire surface.
The French knot is popular among embroidery lovers.
Knotted sutures
French knot, as well as colonial stitches, are groups of single knotted stitches used to fill out a background or add relief to embroidery details.
Knotted embroidery includes such stitches as “worms”, “rococo”, “roses”. If you don’t know seams such as the French knot and those mentioned above, then you won’t be able to embroider at least one of them right away. Need training.
French knots and other similar ones, depending on the size and the chosen thread, produce different effects. For example, when embroidering with iris, the knots will be more voluminous than with regular floss.
The popular French knots are small round shapes that protrude from the surface of the fabric.
French knot and colonial knot are embroidered separately or in groups. To emphasize the center of the flower, they are made with thicker threads than the petals.
The French knot is scattered throughout the motif or filled close to each other, creating a relief pattern.
Colonial knots are used in the same cases as French knots. Outwardly, they look flatter and are easier to perform.
The rococo stitch, a twisted knot, forms small convex roses or twisted springs. They are also used to fill in motifs.
Sometimes the result depends on the number of turns. The thread becomes unruly and the action has to be repeated.
Depending on the final result (height of the knot), threads of different thicknesses are used.
They use knots to embroider the middle of a flower, part of a landscape, or fill the entire figure of a character with knots, as in the embroidery of a snowman.
French knot
Do the following:

Step one
Fasten the thread to the wrong side of the fabric and bring the needle to the right side.
Step two
Wind the thread around the needle 3-4 times, moving them closer to the starting point of piercing the fabric with the needle.
Step three
Pull the thread with your left hand so that all the threads lie tightly near the tip of the needle.

Step four
Insert the needle into a point close to the starting point, still pulling the working thread with your left hand.

Step five
Carefully pass the needle to the puncture point, holding the wound thread with your finger.
If the fabric is very loose, the knot will be on the wrong side. To prevent this from happening, you need to choose the puncture point a little further from the starting point.

Step six
Bring the needle out and embroider the next knot.
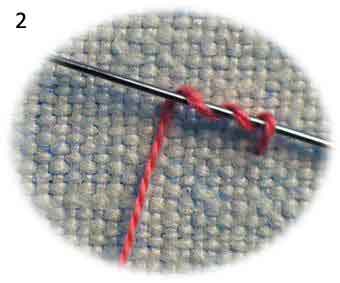
Colonial knot
Do the following:
Colonial knot first
Insert the thread into a tapestry needle, fasten it to the wrong side of the fabric and bring it to the right side.
Colonial nodule second
Place the loop on the fabric as shown in the photo.

Colonial nodule third
The needle passes under the working thread as shown above. Hold the top of the first loop with your finger as you pull the needle under the thread to form the second loop.

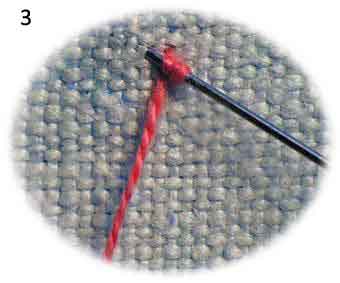
Colonial node four
Place the second loop over the first, as shown in the photo.

Colonial knot fifth
Pass the needle over the outer bottom loop, which is formed at the very beginning of the stitch, where the thread comes out of the fabric.
Colonial knot sixth
There are knots on the needle that need to be moved near the starting point of the needle piercing the fabric.
Colonial knot seventh
Carefully move all these loops on the tip of the needle, holding them with your finger, to the starting point. Be patient and be careful to prevent the threads from slipping up the needle.
Colonial knot eight
Poke the needle through the fabric, holding the knots with your fingers until the thread passes through them. The result will be a bulge that looks like a twisted turban.
Beginning a seam and securing the thread
French knots, like other knots, begin by securing a thread to the wrong side of the fabric. If the knots are embroidered at a large distance from each other, then the thread is secured after each embroidery.
When embroidering tight-fitting knots, the thread is pulled along the wrong side of the work from knot to knot, without securing each embroidered knot.
When starting, make 2-3 small stitches on the wrong side of the fabric. Place the knots in such a way that they are subsequently covered by embroidered stitches.
Needles and some secrets
Some help in creating knots helpful information. Namely:
- embroider knots with a sharp needle in accordance with the thickness of the thread;
- wind the thread onto the needle close to the fabric;
- a neat knot depends on the number of turns, experiment regardless of the ones suggested;
- Do not tighten the thread around the needle;
- press the twisted knots with your finger and pull the needle inside out for a neat appearance of the knot;
- if the turns on the created knot are bristling, then they can be tightened from the inside out, but one at a time;
- wind the turns, within the same design, in one direction;
- First embroider the piece using the indicated stitches, and then make knots.

Thanks for reading.

To reduce thread consumption, they worked with so-called colonial knots and sewed them not closely, but at a long distance from one another. Thus, with the help of these knots it was possible to form a massive embroidery, which, unlike others, was extremely durable and was not afraid of frequent washing.


Nowadays, candlewicking is called needlework using natural dense material with matching threads. This technique uses satin stitch, colonial, French, and other types of seams. Wick embroidery is perfect for decorating bedspreads, bath accessories, and pillows.


Types of stitches
Turkish stitches are performed in several rows. Free loops come in different lengths, the main thing is that the proportions between them are maintained. They are sometimes cut and then it is called loose.

– this type is obtained by twisting a thread around a needle and threading the working thread through the curls on the needle. The composition turns out to be massive and has an extraordinary volume.


Gladeva - continuous filling of the pattern with threads inside the contour.

The tambourine is made in the form of rings emerging from one another.

The stalk is made along the contour of the pattern; it is done not in a row, but diagonally.

The “back needle” stitch is a contour stitch, one of the simplest. It is performed with a string of stitches along a line.


All of the above seams are quite enough to do wick embroidery. It is recommended to train on a light linen base. And choose threads several shades darker in order to monitor the quality of the work done.
Master class candlewicking
- Choose a stencil for wick embroidery or do it yourself. Draw a design of the desired shape and size on the parchment paper using a dark marker. What it will be is up to you to decide: a plant, an animal, or just some symbols.

- Prepare fabric of the required size.
- Translate the drawing. Despite the fact that the fabric is thick, it is quite translucent. Therefore, the stencil is placed underneath the fabric and the pattern is repeated. To prevent the patterned paper from slipping, attach it to the base with pins. Draw the outlines with a regular pencil and the dots with a permanent marker.

- Make sure that the drawing from the sheet was copied without errors.
- We stretch the canvas well and insert it into the hoop.

- At this stage it is necessary to prepare working threads. Floss is also quite suitable for this. Based on the size of the knot and the thickness of the stitch, you can use 4.6, as well as 12 threads.
- Now we are ready to do the work. But don't expect everything to be perfect the first time. Like, you need to practice.
- Follow the diagram exactly. Decide in advance what types of seams you will work with.

- First of all, patterns of knots and satin stitch are made, if such are intended. Small details are also embroidered at this stage of work. The last step is to embroider three-dimensional figures.
- If desired, you can decorate with a variety of beads, rhinestones, and stones.
- It is definitely worth attaching a lining. To do this, place a piece of padding polyester and another piece of cloth under the bottom of the working surface. Now you need to quilt the fabric with a backing for strength.
- Now it's time to use the back stitch. It is used for all volumetric elements and is distinguished by its density (sewn with 2-3 threads).

- If the pattern is ready, then remove the backstitch and direct the picture to washing machine to remove markings on the canvas.
- Carefully iron the embroidery from the wrong side. For more careful care, place wet material on top of the product, and the iron should be moved from top to bottom so as not to damage the knots.
- Choose a frame for finished product to your taste.
Embroidering a heart using mixed techniques
Required materials and accessories in pictures.
Hoop. Scissors and needle for sewing.

light-colored thread

linen material of light (beige) tone.

Permanent marker

Heart stencil
The work consists of many lines produced using different techniques.

- First, transfer the workpiece to the fabric. You do this step until the material is inserted into the hoop. Then, we stretch the canvas well, but make sure that the picture is not distorted and fix it with a hoop.
- We start working from the outer row, using a split seam. The way to do it: we pull the thread to the front side and make a regular stitch, then we move along the line a little further and again bring it to the same part. Then we insert the needle into the middle of the initial stitch so as to split the thread exactly in the center. Using this stitch we sew the row to the end.
- Then, sew over this stitch with loops. We bring the thread from the wrong side to the outer part of the product. We do not pull it all the way, a kind of loop is formed, which we adjust in size at our discretion and press with our fingers.

- Then we pierce the needle from the inside near the rounded part of the loop and attach the loop with a small, almost invisible stitch.
- We make the further contour with wicks (colonial knot). We pull the working thread onto the face, and then wrap it around the needle twice, and only after the manipulations have been done, insert it near the point where the thread exits to the wrong side, forming a jewelry knot.
- We produce a row using split seams. Alternately, either to the left or to the right of the central ones, at a distance of several seams, a stitch is performed (see description in point No. 5). We place the loops not straight, but obliquely, so that the embroidered pattern is similar to leaves. We make the loops with thread half as thin as for embroidering three-dimensional patterns.

- We make a “back needle” stitch for a whole row. We bring the thread to the face and sew the seam to the right, as if returning. Then it is output in the same way, to the left of the starting point of the thread exit - and we return again.
- Close to the previous row we place the next contour of split stitches (see point No. 4).
- The final one consists of colonial nodules (see point 7).

Video lesson colonial knot
Embroidering needle beds with ribbons is the best option for housewives and needlewomen. Today we will learn how to make a very necessary device for every housewife and needlewoman. After going through step-by-step instructions that are accessible even to beginners, you will see that this is not only an entertaining, but also a very inspiring process, since we will be embroidering a dicentra flower, or, as the Germans call it, “a heart flower.”

Preparing for work
Materials for production:
- Ribbons (pink – 10 mm, white – 3 mm, blue – 15 mm, green)
- Green threads
- Lace braid
- Two CDs
- White beads
- Sintepon
Step-by-step master class “flower of the heart”
We cut out a circle of fabric with a diameter of 17 cm and a circle of paper with a diameter of 12 cm. It is worth cutting out three connectors in a circle of paper. And, bending each one, we trace the resulting arcs using pieces of soap. These will be our “heart flower” branches.
This is the location they should be in:


The next step is embroidering the stems. Using a needle and green floss threads, we embroider the branches. We do this using regular stitches of arbitrary length.

Then, we plan the location of our flowers. We make markings with soap. Draw them at small intervals so that the branches with flowers don't end up looking boring.

Using white beads we will make the centers, which will be the centers of our flowers.

Next, embroider 2 petals using a right or left ribbon stitch. We thread the needle through the wrong side and cover the bead, securing it with a ribbon string. On the right side, as usual, we sew another wing, securing everything with the same stitch. We cover everything in the same way.


