Cool and easy DIY crafts for grandma. What to give your grandparents for the New Year to make them happy. Decorated handbag - a simple and colorful gift from grandchildren
Everyone knows how important attention is for older people, which is why it is so important to handmade gift for grandma for any holiday, be it a birthday or March 8th. However, a cute handmade gift will always come in handy - grandma will simply be delighted with the creativity and thoughtfulness of her grandchildren.
DIY birthday gift for grandma
A birthday present for grandma can be absolutely anything - it all depends on the preferences and needs of each person. But, in any case, be sure to accompany your gift with a hand-made bouquet in which two eternal female weaknesses - flowers and sweets - will be in harmony. will be useful.List of what is needed:
- crepe paper,
- candies,
- wire,
- glue gun,
- scotch,
- box of cookies.
The next step is gluing the candy onto the wire; to do this, drop a drop of glue onto the candy wrapper with a glue gun, quickly, before the adhesive composition hardens, dip the wire tip into the glue and wrap the candy wrapper around it. Please note that the candy cannot be pierced with wire!
You can also attach sweets using tape - the candy wrapper is wrapped around a wire and then secured with tape.
To make the inside of the flower, take a light green paper blank and make a wavy edge along the entire length with your index and thumb. Proceed in the same way with the rest of the light green parts. Then pull each one towards the edges from the center to create a recess for the candy
To make snowdrop petals, divide each white strip into 3 equal parts, bend each piece in half to find its middle. At this fold, wrap the half of the part 360 degrees along its axis. Repeat these manipulations with the remaining 14 blanks.
Fold the twisted strip in half and bend the middle from the center to the edge, using your thumbs. Each petal should have a convex shape.
Wrap the light green center around the candy and secure with tape or thread. Then gather the white petals slightly overlapping around the center. Also secure the petals with tape or thread. Trim the tips of the petals at approximately 45 degrees - this will help make a smooth transition from the snowdrop to the stem.
Snowdrops will show off on a box of chocolates or cookies, which is why when all the flowers are ready, you will need to bend the wire a little and figure out exactly what the finished flower arrangement will look like.

The pieces of green crepe paper should be divided into 4 parts, cut out a leaf from each part. Fold each one out, running your thumb along the underside.
The stem must be wrapped with light green tape, then at a distance of 4-5 cm from the bud you must insert a leaf, wrapping it deeper at the base with tape. Collect the finished snowdrops into a single composition, tie it with a ribbon, and disguise the ends of the wire stems. You can use beads to decorate the bouquet.
In several places of the bouquet (on the stem), drop drops of glue from a thermal gun and secure it to the box of chocolates. Here you have a wonderful craft! By the way, since snowdrops were used in this master class, such a bouquet will be wonderful DIY gift for grandma on March 8th. Check out other people's ideas too.
DIY gift for grandma for her birthday
If grandma has poor eyesight (and this is by no means uncommon for older people), then a case for glasses would be an excellent present. The grandmother will take it in her hands several times a day, each time remembering her grandchildren with gratitude.Prepare:
- bright fabric,
- lining material,
- batting,
- pins,
- threads,
- satin ribbon.

Fold the batting blanks with the parts for the outside of the case, and fasten them diagonally with pins. Sew the blanks diagonally with contrasting threads. Fold the satin ribbon in half and attach it to the edge of the workpiece with a pin.
Align the blanks so that the batting sides “look” outward, fasten with pins, and then baste along the outer edge, not forgetting the 0.6 cm allowance.

Unfold the stitched part, iron the edges and trim the seam allowance. The excess along the bottom seam should be trimmed, but it is very important not to damage the seam itself. Turn the workpiece inside out and iron it.
Fold the raw top edges evenly inward, iron and secure with pins.
With the right side facing in, pin the lining and sew along the edge, but do not sew the top edge. Fold the top 1.25 cm and iron.
Fold the ruffle strip right side inward with an overlap of 7.5 cm. Sew (don’t forget about the 0.6 cm allowance), iron. Fold the ribbon in half and iron it. Sew along the raw edge through two layers of fabric, leaving ten centimeters of thread at the beginning and end. Pull the thread, making a frill.

Place the frill on the future case, aligning the raw edge of the frill with the top edge of the case. Sew the frill with an allowance of 1.25 cm. Insert the lining into the case blank. Align the seam of the frill with the folded edge of the lining and fasten. Carefully sew from the inside with matching thread. Iron the finished case.
DIY gift for grandma on her 8th birthday
Even novice craftswomen can easily master such a type of needlework as decoupage, which is why it is excellent a gift to grandmother from her granddaughter, with her own hands When done, there will be a cutting board decorated using this technique.Materials and tools:
- cutting board,
- dye,
- decoupage napkin,
- file,
- PVA glue.

The drawing should be covered with PVA glue diluted with water; you can also use office glue. Wait for the adhesive to dry.

To decorate the ends, mix gold and black paint, paint the ends with this mixture in two layers, after the paint has dried, the product can be varnished. Apply a layer of acrylic construction semi-gloss varnish, after drying, apply a second coat of varnish. This manipulation will make the product more durable and water resistant. Now you know, what gift to make for grandma with your own hands using decoupage technique.
How to make a gift for your grandmother with your own hands
A very interesting gift option would be a coffee vase, which you can easily make yourself.Prepare:
- mug,
- coffee beans,
- cotton pads,
- hot glue,
- brown paint.
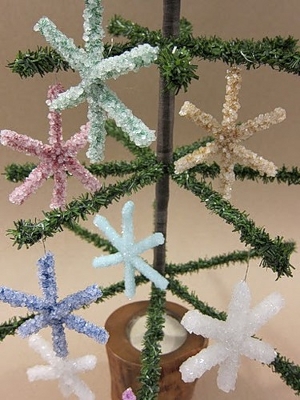
A master class on growing very beautiful snowflakes from a solution of borax crystals in water will help you decorate your house for the New Year. Borax can be purchased at a pharmacy, hardware store, or in the laundry detergent section of the supermarket. and you can see what borax looks like and also learn about its properties.
You will also need:
Special brushes for cleaning smoking pipes (sold in tobacco stores)
- food coloring (optional)
If you were unable to buy brushes for cleaning smoking pipes, you can replace them with wire wrapped in thick woolen thread.
Work plan:
1. First you need to make a supersaturated solution of borax in water. To do this, gradually add borax to hot water, stirring. Approximate proportion (3 full tablespoons per glass of water). Only after achieving complete dissolution of the last portion, add the next one. You need to add enough borax so that the water becomes cloudy, almost opaque. As you add, if you clearly see undissolved borax crystals in the water, you should not add more: the undissolved crystals in the mixture will act as a “distracting” element, and the crystals will begin to grow around these particles, and not around your snowflake. Therefore, it is better to strain the solution.
Pour the mixture into a glass beaker, bowl, jar or jug (depending on the size of the crystal you want to grow). Glass containers must have a fairly wide neck.

2. Make a snowflake out of a pipe cleaner. Tie a rope or attach a wire to it. Wind the other end of the rope (wire) around a pencil (stick).

3. Immerse the snowflake in the borax solution.

4. Place the container with the suspended structure where no one will disturb it for a long time. In about a day the snowflake will be ready!
1. If you want to get colored snowflakes, add dye to the borax solution, or use colored pipe cleaners to clean smoking pipes.
2. The borax solution can be reused by preheating it in the microwave. But the crystallization process will take a little longer.
3. If the borax begins to crystallize when you pour the mixture from the pan into a glass container, try preheating the container with clean hot water;
4. Make sure that borax and borax crystals do not fall into the hands of small children! If borax is ingested in large enough quantities, it will become toxic to the body. All materials that have come into contact with borax must be thoroughly rinsed. Materials contaminated with borax should not be used for preparing or eating food.
5. Growing a crystal snowflake from borax is not only a fascinating, but also a useful activity - an entertaining scientific experiment on growing crystals at home.
New Year, according to tradition, is a family holiday. This is the day when the whole family and close friends gather together at one table, giving each other gifts and good mood. On this holiday it is customary to give warm, soulful gifts, so many people prefer to give gifts made with their own hands.
Children also strive to take as much part in the preparations for the New Year as possible, because for all kids it is associated with magic and all kinds of surprises and miracles. This is the day when everything is possible.
Even the most notorious little restless and mischievous people will want to please their beloved dad and grandparents with a gift. And the role of the mother is to suggest and help how to do this.

Make a joint gift for your beloved dad with your child. From you - a prepared gift, and from the child - a homemade postcard for him. He will definitely be delighted with such a surprise.
The easiest way to make a New Year's card with a child is applique.
For this you will need:
- glue stick;
- colored paper;
- scissors;
- a simple pencil;
- colored pens or markers.
Making a card with a Christmas tree:
1. We will use red double-sided paper for the base, and green for the Christmas tree. We cut a sheet of green paper exactly along the edges so that it is 0.5-1 cm smaller on each side than the postcard itself.
2. Fold a sheet of green paper in half and draw a Christmas tree with a pencil.

You can prepare a template for the Christmas tree in advance from plain white paper so that your child can independently attach and trace it with a pencil on green paper.
3. Cut out the branches of the Christmas tree, as shown in the picture below. Be careful not to cut off the sides.

4. Glue the green leaf to the red base with a glue stick (there is no need to glue the Christmas tree itself).

How to do it yourself: If you have shaped hole punches, you can use them to make stars or snowflakes; if not, your child can simply draw them with colored pens or markers, or they can be cut out of paper according to a template.

Such a simple card will not take up much of your time, and the child will be endlessly happy to give dad a gift that he made himself.
If you don’t have colored paper on hand, you can make a cute snow-covered Christmas tree out of white. She doesn't look any worse.

In addition to Christmas trees, you can make cards with snowmen, New Year's balls and snowflakes. They are all simple, but for all their simplicity, they look very beautiful and elegant.
A few ideas for crafts with your child for the New Year for your inspiration.
A simple snowman card that you can make together even with the smallest children.

You can use buttons to depict a snowman.

Multi-colored buttons will also look great as New Year's balls.

Instead of a Christmas tree, using the same principle, you can make a card with a mountain of gifts and write a wish on each gift.

Crafts with children for the New Year as a gift for grandparents
All grandmothers, without exception, are delighted with any achievements of their grandchildren. And how happy they will be to receive a homemade souvenir from them! Then for another whole year they will show it to all their friends and acquaintances, proudly saying: “My grandson made this for me himself, what a great guy!”
Together with the smallest children, you can make toys for the Christmas tree for grandparents. Such a gift will be carefully kept and give pleasant memories.
Making Christmas toys with children
Required:
- ice cream sticks;
- glue gun;
- paints;
- buttons, beads, rhinestones, ribbons and everything you can find at home for decoration.
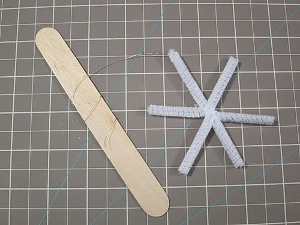
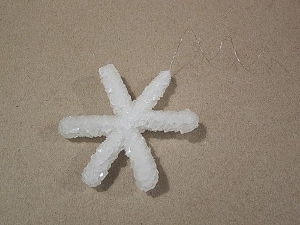
Making a snowflake toy
1. First, prepare the foundation for your child yourself. Use a glue gun to attach 4 popsicle sticks together. Let it dry.

2. Now you can give your baby complete creative freedom. Choose a color with it and paint the snowflakes.

3. After the paint has dried, you can start decorating: paint a snowflake, stick beads on it, tie ribbons and whatever your heart desires. It will make a very cute souvenir for the New Year.

Using the same technique you can make a Christmas tree.

Toys for the New Year tree can be made from large beads. For such a toy you will need wire and multi-colored beads. Bend the wire into a candy shape or any other shape and string beads onto it.

It is best to use large beads, this will make it easier for the child to string them onto the wire. Be careful not to leave your child alone with the beads.
Crafts for older children
If your child is old enough to be trusted with a needle, then a kitchen towel with a Christmas tree would be an excellent gift for grandma for the New Year.
Buy a regular white waffle towel. Draw strokes on it with a simple pencil, as shown in the picture below.

How to do it yourself: Give your child some thread and a needle and show him how to draw the thread along the drawn lines. To make it easier for your child, secure the fabric in a hoop. Such a towel, without a doubt, will pleasantly surprise your grandmother and will delight her for many years to come.
You can also give your grandparents a cute snowman; you can put it under the Christmas tree or on a shelf near the TV. It will immediately bring the New Year's mood into the house.
It is done simply and quite quickly.
Required:
- sock;
- buttons;
- money rubber bands;
- rice for filling;
- eye pins;
- ribbon or piece of fabric for a scarf.
Making a snowman:
1. First, cut off the top part of the sock. Fill the snowman's body with rice and tie a rubber band. Now we fill the head and also tie it with an elastic band.

2. Roll up the remaining part of the sock and make a hat out of it. The hat can also be made from a sock of a different color.

3. Now we tie a ribbon around the neck, glue or sew on buttons, and give the snowman a nose and eyes. If there are no pins, the eyes and nose can be embroidered or simply drawn.

Such a snowman, made with love by the hands of a child, will take pride of place in the home of grandparents.
Involve your child in creativity from an early age, and then he will grow up with a rich imagination and skillful hands.
Birthday is a special day for everyone. On this day you always want increased attention, just a great mood, interesting jokes and pranks on friends and, of course, gifts. Let's think together about what gift we can make for grandma's birthday with our own hands together with the children.
Imagine the joy of a grandmother who received her gift from the hands of her beloved grandson or granddaughter?!! It’s no secret that grandmothers perceive their grandchildren more jealously, feel them more deeply than their own children, so a handmade gift to your grandmother will be the most, most precious to her.
The question of how to give grandma a gift should be decided by the child himself in the presence of adults. Maybe your child wants to give something special, but he can’t do it without your help or needs your help. In any case, he must choose the gift idea personally.
Gifts made from natural materials
If a child has not yet reached school age, but really wants to make a gift with his own hands, he can be captivated (with pine cones, pieces of bark, moss, etc.).
The craft can be either flat or voluminous. The first option will be easiest for the baby to cope with, but the voluminous one looks more interesting)
Make these owls with your baby. As you know, the owl is a symbol of wisdom. Grandmother, wise with life experience, will appreciate such a gift.

MASTER CLASS ON THE TOPIC
Continuing the theme about owls, watch our crochet master class “Miniature amigurumi toys: knitting a clever owl”. Certainly. The child cannot cope with this task on his own, but he can choose the colors of the threads, glue on the eyes and try to embroider feathers.


MASTER CLASS ON THE TOPIC
A postcard could look like this, for example. Instead of decorative flowers, glue dried ones. Watch the master class “Beautiful, simple do-it-yourself postcard using the Scrapbooking technique.” It’s really very simple, the baby can glue the multi-colored strips of paper himself!


But you can try really hard and make a really amazing picture! Yes, accuracy is required here, so mom will glue the flowers, but the baby will be happy to help collect and dry them!

It’s enough just to make roses from orange peel and create a beautiful composition that will decorate the interior.

To do this, from the very top of the orange, you need to cut a thin strip of peel in a spiral, trying to capture the white strip on top. The orange peel is very easy to roll into a spiral; you just need to dry it. You need to dry it on a radiator for 2 days, laying out the “roses” on cardboard. You can dry an orange cut into slices in the same way, it will be an excellent addition to a future composition!

If you still have dried flowers, leaves, and berries, then you can safely use all this! The girls will be happy to create such beauty for their beloved grandmother!
MASTER CLASSES ON THE TOPIC
By the way, coffee beans are another wonderful material, completely of natural origin! You can make coffee from beans (see master classes at the corresponding links):


Drawing with volumetric elements
Of course, the grandson will not always give a gift to his grandmother on his birthday with his own hand. Once he leaves to study or work, grandma will receive only luxurious greeting cards.
That is why now a gift from grandchildren entering primary school is so important, we love it and wish it with all our hearts.
A child can make a gift to his grandmother with his own hands by drawing a beautiful favorite flower, his own or his grandmother’s. You can offer him to cut out three-dimensional flowers from a napkin and glue them, thus decorating the design.

For flowers you need to take 2 layers of napkins, one can be colored, the other can be white. Fold each layer in four, then in four again and place them on top of each other. Fasten with a stapler as shown in the figure.

Next, you need to cut the napkin into 4 equal parts and cut out a flower from each of them. Then, one by one, lift and pinch each layer of napkin in the center, hiding the paperclip. Now straighten the flowers and you can glue them onto the drawing!
Quilling is a masterpiece of craftsmanship
The skill of quilling came to us, as they say, from England, where noble ladies practiced this art. Today, in order to make something using the quilling technique, it is enough to buy a special kit, which includes an awl, glue, a ruler with circles and sets of strips of paper of different widths. Products created using quilling are already masterpieces in themselves, and a simple composition created with love will create a real sensation at grandma’s name day.

The ease of working with paper strips and the ease of assembling shapes will amaze everyone who has worked with this material: twist a strip of paper tightly, then create the necessary shape, assemble the intended element from several smaller elements, and glue it onto a sheet of cardboard. Such masterpieces can be stored indefinitely, but it is better to impregnate the paper with a special compound to prevent fading.

Gift for a handicraft grandmother
Many grandmothers are fond of one or another type of needlework. They often instill a love of needlework in their daughters and granddaughters. If just such a wonderful story happened to you, then you can definitely make a gift for your grandmother’s birthday with your own hands!

Let's take this idea as a basis and refine it. The frame made from spools of thread and buttons is very good! You can stop there and simply insert a photo of your grandmother into the frame. Or you can completely repeat the author’s original idea, only nail another small nail on the back wall, on which grandma can hang her scissors! You can sew a pincushion and place it somewhere here, then grandma will have everything at hand! This is the best gift for a handicraft grandmother!
A bouquet of artificial flowers and balls also looks very cute and will never fade!

What do you think of this composition? From the photo it is quite clear how to give grandma a gift of this kind.

MASTER CLASSES ON THE TOPIC
Since grandma herself is fond of needlework, she will definitely highly appreciate your creativity. For example, bright citrus coasters made of felt for a mug of hot tea or a cozy amulet for the home made from a wooden kitchen spatula.


Original gift ideas
What gift can you give your grandmother if she loves and appreciates original things, collects figurines and is a big fan of interesting accessories? Give your grandma a stylish watch with photos instead of numbers as a gift! You can alternate photos with small handmade souvenirs, for example, embroidered magnets or buttons.


Girls are quite capable of knitting funny oven mitts in the shape of little animals for their grandmother. She will be very pleased!
Most likely, your beloved grandmother will also appreciate a gift specially purchased for her in a souvenir store, but even if it is something she has long dreamed of, she will certainly remember a birthday gift for her grandmother made by your hands.
MASTER CLASSES ON THE TOPIC
Even a purchased gift can be presented very sincerely if you make the packaging for it yourself. The master class “Gift boxes without glue: what could be simpler?” will help you.

There are things that each of us must be able to do. For example, make a gift for your grandmother’s birthday with your own hands. Of course, today you can buy any item in the store, and grandma will appreciate your efforts. However exclusive gift received from granddaughter or from a grandson and decorated with your own hands will bring much more joy and positivity. We will tell you later in the article how to make an unforgettable surprise for a loved one.
Grandmothers sometimes love their grandchildren more than their own grown-up children. And the grandchildren, in gratitude for the love, care, understanding and all sorts of goodies, can independently make a gift to their grandmother for her birthday, which she will remember and keep with pleasure throughout her life. Depending on your capabilities, you can think over a serious and useful gift(for example, sew a pillow), or you can make a nice little thing in just 5 minutes.
For example, try making a stylish stand for indoor plants from ordinary wooden clothespins. Plant some greens, mint or a small flower in a pot and give it to your grandmother as a keepsake.
 If you have no idea what you can present to your grandmother for her 80th birthday, give her memories. Family photos in beautiful design will help reveal many family stories that you did not know about before.
 A nice gift from my grandson - spring flowers in a cup.
Grandmothers are unsurpassed kitchen wizards and thrifty housewives. Give it to your grandma useful kitchen items, made with taste by your own hands.

 Decorate a bag for grandma with your own hands. Using acrylic paints and pieces of vegetables or fruits, you can draw original patterns on fabric. With such a bag, grandma will be happy to go shopping and delight you with new goodies. And best of all - visit your grandmother more often and don’t forget to help her with the housework.
 For 75 years You can present your grandmother with a beautiful handmade vase.

Give it to your grandmother as a gift for her anniversary. original candlestick.
What to give your grandmother on March 8, made with your own hands?
You can please your grandmother on March 8th with warmth and care. Prepare a surprise tea box for her. Place in a box with tea bags notes with words of love and gratitude. And then have a festive tea party with grandma.  The continuation of the first gift will be a delicious cake that you bake for your grandmother with your own hands.
Design for grandma several vases in an original way.
A nice DIY gift for grandma - soft rug, which you can make from pieces of old things.
 Paper also produces a lot of interesting and useful things. A memorable gift - a postcard - can be presented on other occasions, on March 8, and on any other holiday. Try it decorate a card with paper flowers, and write the text yourself, from the heart, with words of gratitude. We wrote in detail about how to make flowers from paper in one of the previous articles, and we are sure that you will find words of congratulations in your heart.
How to make a paper gift card for your grandmother for the holiday?
We will tell you more about making cards for grandma right now. For example, you want give 65th birthday card for grandma and please her with gentle congratulations, sincere words or beautiful poems.
 Beautifully designed photos of your beloved grandchildren will be an excellent card for your grandmother's anniversary.

Ideas for cards for congratulating grandma are striking in their variety and simplicity. For making postcards you will need very few things.
- Scrapbooking paper
- Corrugated paper (for flowers)
- Lace
- Colored paper
- Cardboard
- Glue
- Scissors
- Colored ribbons
- Beads, beads, pearls

By combining these elements into a harmonious composition, you will receive a wonderful postcard as a gift for your beloved grandmother.


