How to make a paper tulip with your own hands. How to make a paper tulip with your own hands - assembly diagram and video master class. An easy and quick way to make a tulip from colored paper
Instructions for making a paper tulip.
As the holidays approach, many children strive to congratulate their mothers and surprise them with homemade gifts. Origami flowers are perfect for this. In this article we will tell you how to make a tulip from paper and other available materials.
Origami is an art form that came to us from eastern countries. Nowadays, many people practice origami, as it calms their nerves and allows them to surprise loved ones with unusual gifts. Below are diagrams and step-by-step instructions for making a paper tulip using the origami technique.


How to make a three-dimensional tulip flower from colored paper?
This option is more suitable for children in preschool educational institutions. Such a flower can become part of a greeting applique for Mother's Day. Similar flowers can complement voluminous postcard. Below is a video on making a tulip from colored paper.
VIDEO: Tulips made of colored paper
These flowers are best made for candy bouquets. Crepe paper is used for production.
Instructions:
- Cut six ovals of the same size from paper
- Using your fingers, stretch the edges across the width
- After this, using rubbing movements, make a base for fastening
- You should now have a tube at the bottom of the petal.
- Place the candy inside and glue all the petals together


This is a very simple checkout wizard. Also often used to create candy bouquets.
Instructions:
- Cut from corrugated paper 6 strips 15 cm long and 4 cm wide
- After this, fold each strip in half and twist it at the fold.
- Now align the strips so that they are one to one
- Roll the petal into a tube at the bottom
- Now you can glue tulips onto a wire by stringing candies on it


Making such a bouquet is quite simple. It takes a little patience and time. An excellent gift for March 8th.
Instructions:
- One flower requires five plastic spoons
- Cut rectangles from red crepe paper and wrap spoons
- After this, fold the two blanks one by one and secure with tape.
- Attach three more around the perimeter of these spoons
- As a result, you will get a tulip. Wrap it in green corrugation
- Make several of these tulips, cut out the leaves and assemble a bouquet


Ideal option for preschoolers.
Instructions:
- Cut the green colored paper into strips, these will be stems
- Cut out leaves from green paper
- Make 2 three-petaled flowers from red paper
- Glue the stem, leaves, and one bud onto a sheet of colored paper.
- Fold the second bud in half and glue it exactly at the bend.

VIDEO: Applique tulips
Below are several tulip templates for cutting out. Choose the most suitable one.


DIY paper tulip ideas: photo
Thanks to paper, you can create excellent and varied compositions. They will help complement the main gift. It's also a great way to disguise candy. Such bouquets look organic and unusual. DIY paper tulip ideas: photo
VIDEO: Paper tulips
A tulip or a bouquet of tulips made of paper is a wonderful, original addition to a gift for any occasion. This article will present master classes with step by step instructions for making a paper tulip.


Video for inspiration and training
In the selection of videos offered below, needlewomen will share their experience and talk about several options for making paper tulips from different types paper.
Paper tulip: folding patterns
In order to understand the basic principles of how to fold a flower, you will need a diagram and a sheet of white paper.
First you need to make a sheet square shape, but you shouldn’t throw away the extra strip of paper. Then the resulting square should be folded diagonally twice, then the side edges should be folded inward so that the center of the square is the vertex of the triangle. Next, the lower corners of the triangle must be folded upward, i.e., towards the center.
Then the figure should be turned over and the lower corners of the other triangle should be folded in the same way. After this, the corners should be moved inward, i.e., the opposite corners should be folded.
The previously set aside strip of paper must be folded, this will form a stem, all that remains is to connect the flower with the stem and the work can be considered complete. Below we will illustrate the process of making a paper tulip in stages.

A bright bouquet of tulips made from colored paper looks beautiful. You can choose sheets of paper for work different colors and be sure to have a sheet of green paper to make the stems. Below you will find instructions that describe each stage of the work in detail.


Volumetric flowers made of corrugated paper
Volumetric tulips made of corrugated paper look festive. For work you will need: corrugated paper, as well as scissors, glue and wire. First of all, you need to make flower petals; to do this, cut a strip three centimeters wide and eighteen centimeters long from a sheet of paper. Then the resulting strip must be folded several times until the width is four centimeters.
Then you should mark the outline of the petal, then cut out the petals using scissors. Next, you need to give the petals a more natural shape, narrowing at the bottom and widening at the top. In order to form a bud, you need to put eight petals together.
In order to make a stem, you need to cut a strip of green paper and wrap it around a wire, and also cut a leaf from the strip. The leaf is attached to the stem with glue. The finished bud must be attached to the stem, and the flower is ready. To make a blossoming bud from paper yellow color you can make stamens and attach them inside the bud.
There is another origami technique for making a tulip flower. You need to cut several strips of paper four centimeters wide, then each strip needs to be twisted in the middle and folded in half. Next, each layer of paper must be stretched a little to make the flower voluminous; the base of the flower should be twisted.
To make stems, pieces of wire must be wrapped in green stripes. Then the petals need to be secured around the stem with glue. You can also glue the leaves and the flowers are ready.


Tulips are very popular in spring, and the main reason for this is International Women's Day. A bouquet of tulips is a traditional gift for March 8th to mother and grandmother, sister and friend. But not only fresh flowers are in great demand - paper tulips too! Many people prefer paper flowers because they are easier to make than flowers made from fabric or polymer clay.
"Cross" will tell you how to make paper tulips with your own hands. And you promise to make them and give them to your loved ones)
Tulips made using the Quilling technique are particularly elegant and sophisticated. You won’t need a lot of materials, tools and skills, but the result will please you, so that’s what we’ll do.

Prepare everything you need:
- strips of quilling paper (pink, light green and light brown)
YOU WILL NEED IT
You can buy paper for Quilling immediately in a set. This will allow you to create without limiting your choice of colors.
- white paper
- cardboard
- toothpicks
- a small cylindrical object (you can use a tube of PVA glue)

Wrap a pink strip of paper around a cylindrical object and glue the tip with a small amount of glue.

Carefully remove the resulting circle from the cylindrical base. Make 9-15 such blanks (the number of blanks should be a multiple of 3).

Then squeeze each round piece on one side to give it a teardrop shape.

Take a toothpick and roll the pink strip of paper into a tight “roll”, leaving a small part untwisted:


Continue twisting about 6-9 strips of paper in this way (you should end up with blanks like in the photo):

Make as many blanks as you have “tears”.
And then just put the spiral blanks into the “tear drops” and get paper tulip petals!

Now we will make the leaves. Twist a strip of light green paper onto a toothpick, remove and let it loosen to some extent.

Glue the tip:

Squeeze the workpiece on both sides so as to give it the shape of the English letter S. This is how easy it is to make leaves)

On paper or cardboard white glue 3 petals, but before that, think through the entire flower arrangement in advance.

Make several of these paper tulips with your own hands.

Fold the light brown strip of paper in half and glue both halves together.

Give this strip a beautiful curved shape, and then apply glue to one of the sides.

Glue carefully next to one of the flowers, thus making a stem.

Glue the stems to all the tulips:

And then glue the leaves.

Now you know how to make tulips from paper - it’s not at all difficult, right?

The tulip petals can be sharpened more on one side, then the flowers will look like this:

Similar blanks of petals and leaves are useful for creating different tulips from paper with your own hands:


However, from strips of paper you can also make a full-fledged element, which in Quilling is called exactly the same - “tulip”.
A tulip with 2 petals is made like this. First, roll a traditional “roll” on a toothpick, and then, holding it with the fingers of one hand, press it onto a cylindrical object such as a pen or pencil. As a result of bending the paper, you will get 2 petals:

To make a “tulip” element with 3 petals, the twisted “roll” must be held in one hand, and with the index and thumb of the other hand, press the middle point, making it slightly higher than at the ends.
Spring is coming, the time of love and flowers, spring holidays. Yes, and I just want to
please your beloved women with flowers. However, this pleasure is not cheap now. What to do? Ancient origami will help us out. It has more than once helped those who like to be original, and now it will help unusual gift your loved ones. We invite you to make a bouquet of delicate tulips using the origami technique. After all, as they say, the most unforgettable gift is a gift that is made with your own hands.
Simply and easily
There are many options, from the simplest to the more intricate.
In this article we will tell you one of the most simple ways how to make a tulip out of paper. A small note: it is better to take thick paper for a tulip so that it can hold its volume well.
Required material
To make a tulip you will need to prepare:
- 1 sheet of paper for a tulip (paper format and color is entirely at your discretion);
- 1 green sheet of paper for the stem;
- PVA glue;
- pencil or pen.
Let's get started
So, the scheme is quite simple.
Take a sheet of paper. If it is rectangular, make a diagonal bend so that the sheet is square. You cut off the excess part, and you won’t need it anymore.

Fold the sheet in a different direction. You will end up with two lines crossing a square piece of paper crosswise.

Fold the sheet in half to form a rectangle.

Fold the triangle, bending both sides of the square inward.
Smooth out the corners of the triangle.

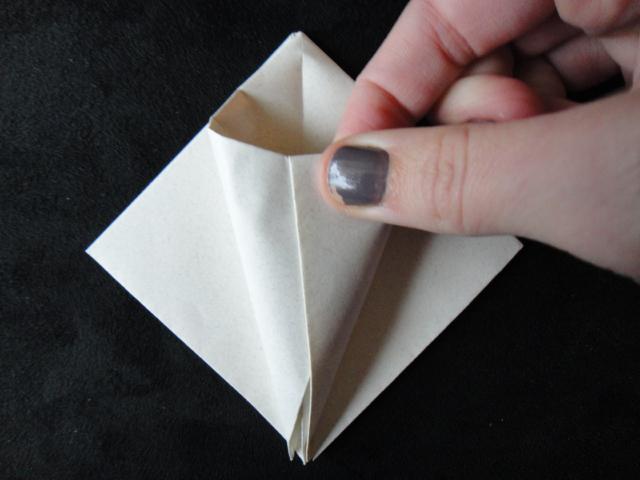
Bend the corners of the triangle towards the apex on both sides.
This results in a four-sided figure.

Both bent triangles must be inserted with their ends facing each other. You have got two unique “little bags”.

And the final stages
At the bottom we make a hole for the stem. Inflate the tulip so that it becomes voluminous.

A few more steps and you will learn how to make a paper tulip. We turn the tulip over and bend four petals from the point side.

Making a stem
Take a green sheet of paper. Screw it tightly onto a pencil or pen. Glue the end of the leaf and twist it. Take out the pencil. We insert the resulting tube into the bud.

We make a leaf for the tulip from the same green paper and glue it to the stem.
Here's a tulip. The scheme, as you can see, is simple. But not everyone succeeds the first time. Try again - and you will succeed.
How to make a paper tulip without getting bored? Of course, together with the children. The child will be happy to surprise his beloved mother with a bouquet of homemade tulips for March 8th. And simply, without any reason.

In conclusion
This craft is perfect for decorating your home and creating a spring mood for your whole family; it will bring a feeling of celebration and freshness to your home. And what’s more, such flowers will last much longer than real ones. And the joy from them is no less.
We wish you success in all your endeavors.
Origami is a fun and useful activity. A popular figure that many had to enthusiastically fold in childhood is the tulip. This is one of the simple and interesting origami models. We suggest you remember how to make a tulip out of paper and teach it to children.
Paper folding different figures develops with his own hands fine motor skills, concentration and attentiveness. Children and adults should be encouraged to stimulate these qualities. If you want to engage your child in something, offer to make paper crafts.
To make paper flowers, you don't need to use scissors and glue. Therefore to exciting activity You can attract even restless kids.
Show them how to make a beautiful tulip out of paper, collect a whole bouquet and decorate the room with such a spring gift. For these purposes you will need white or colored (preferably double-sided) paper.

If you’ve forgotten or don’t know how to make a paper flower, then we offer simple step-by-step instructions:
- Take a sheet of A4 paper and make a square out of it: fold it diagonally, and bend the remaining piece and tear it off.
- Unfold the square and bend along the second diagonal.
- Unfold again and fold in half. Draw carefully along the fold lines. There should be 8 triangles on a piece of paper.
- Turn the workpiece over with the transverse fold up and bend the side triangles inward. Focus on the fold lines. A two-layer triangle will come out.
- Fold the edges of the workpiece to the top point. You will get a rhombus with parts cut in the center.
- Unfold the workpiece with the uncut part. Fold the corners so that they cover 2/3 of the shape and overlap at the center line. To do this, step back from the top point by 0.3–0.5 mm.
- Pass one corner into the pocket of the other. Repeat the same on the other side.
- Take the structure in your hand and straighten it. Inflate through the hole created during the folding process. The figure will gain volume.
- Bend back the petals.
- Use the remaining paper to form a stem and place a flower on it.

A paper tulip is a simple and interesting figure that is easy to model. Children will easily grasp the sequence of actions and will enthusiastically create their own greenhouse of paper flowers. Try making this flower from corrugated paper. It will come out original and unusual.


