Step-by-step instructions on how to sew a doll. Step-by-step instructions for making your own dolls. Dolls made from plastic bottles
Give it to a first grader? How about a hand-sewn textile doll? Such a gift will be symbolic not only for a girl going to first grade, but also for a graduate.
To sew the body, we used a piece of thick knitwear measuring approximately 50 x 40 cm. We print the proposed pattern on a printer or redraw it by attaching a sheet of paper to the computer monitor.


We transfer all the details to the knitwear except the wedges. They are cut out of white calico or calico in the amount of 6 pieces. We sew them together, leaving a small hole in the center. We sew along the contour using a machine. We leave small holes (1-1.5 cm each), through which we will turn the workpieces inside out and then fill them with filler.


You can turn out the parts using a sushi stick. It is also convenient for her to fill the parts with holofiber or padding polyester.


We put a covering on a ball sewn from wedges and tightly stuffed with filler, and tighten the top.


On the opposite side we make a depression in the filler, into which we push the knitted “branch”.


We insert the neck into this hole. To fix it, you can drop a little Moment glue on it or fix it with a thread, connecting it to the top of your head. We connect the junction of the neck with the head with a hidden seam.

We fix the legs to the body with pins, making sure that they are attached at the same level. Then we sew them through the body using buttons. This fastening allows the finished doll to be planted and its legs and arms to be rotated.


We sew tights from an adult sock. To do this, we cut off the toe part of the product, cut it in half, and grind off the sections.


Next we sew for the doll school uniform. Since our future “first-grader” will not be a playroom, but rather an interior one, her dress will not be removable. Only four parts are needed - two sleeves, a bodice and a hem.

We first draw an approximate bodice pattern on paper, apply it to the body, and adjust it in circumference and height. For the hem, cut out a strip of fabric measuring approximately 6 x 30 cm, and gather in the top edge.

We apply the handles to the fabric, trace them along the contour, thus obtaining blanks for making sleeves.

We connect the bodice and hem, process the cuts, you can immediately sew a lace collar in the neck area.

Sew a vertical section on the back. We also sew lace braid on the sleeves and put them on the handles.

Now you can fix them on the body. We pass through the body with a long needle with a double thread, grasping the handles only through their inner part.


We sew a white apron using lace, braid or regular white chintz.

At the next stage, we create a hairstyle on the doll’s head. In this master class we used tresses with artificial hair one meter long. Instead, you can use felting wool, knitting threads, satin ribbon, foamiran, etc.
Sewing on the tresses starts from the bottom of the head and is carried out along its entire circumference.


First, you can fix the hairs with Moment glue, and also sew them on for reliability. From the remaining piece of tress 8-10 cm long we form a bun, insert it into a small hole on the top of the head.

Interior dolls have become an original home decoration that has received recognition from needlewomen around the world. They attract the attention of those who appreciate design solutions in the interior. There are such handmade dolls different types and differ from each other in the method of creation and external parameters. Interior doll

Types of dolls for home decoration
There are five types of textile dolls that are created by needlewomen to decorate home interiors:
- Anime doll. These dolls are made in the style of Asian cartoon characters. As a rule, their head is larger than their body, and their legs and arms are miniature in size. The creator of anime dolls is an artist from Scotland - Susan Woolcott.
- A doll with a pumpkin head. Distinctive features Such a doll consists of a head that is shaped like a pumpkin, a convex chin and a nose.
- Tilda doll. One of the most popular types of interior dolls. Everyone has seen Tilda at least once in their life. The proportions of her body are out of the ordinary; she has long thin legs and arms, an elongated head, which seems to serve as an extension of her neck. Tilda has no mouth, but she has beady eyes and rosy cheeks. Interior doll
- Korean Barbie. Such dolls have beautiful shape bodies. Their luxurious look in an elegant outfit is always accompanied by accessories in the form of handbags, umbrellas, and hats. Masters create the faces of these Korean beauties using acrylic paints.
- Snowball doll. Doll from Russian designer Tatyana Konne. Characteristics Snowballs are massive feet on which the doll can stand without support, as well as eyes made of beads. Creating shoes and clothes for such a doll is a separate form of art.

Textile doll pattern
A big advantage when creating an interior doll will be knowledge of basic cutting skills; in this case, you can create your own patterns. If you don’t have such experience, then this is not a problem at all, because any business can be learned. Beginning needlewomen can take samples from the Internet or specialized magazines. Interior doll
Natural elastic fabrics are used to make textile dolls. Typically knitted fiber. It is also possible to use synthetics, for example, nylon. Fill the doll with padding polyester. Before starting the pattern, it is necessary to give the fabric the proper appearance. First, it is ironed to get rid of bruises, and then the contours of future parts are drawn using a special marker.
Patterns

Making interior dolls is possible for all beginners. It is possible to sew a full-fledged doll the first time, albeit with errors and flaws. In online resources you can find a number of master classes and training videos on this topic. Let's take a quick look at what steps and in what order to take when sewing a doll:
- The fabric with the patterns is folded in half, and then sewing machine stitched along the contours of the parts that were drawn with a marker or chalk on this fabric. After the parts are stitched, they are cut out and turned right side out. In order for them to take on a clear shape along the stitched contours, they must be ironed.
- After this, the parts are stuffed with filler and stitched together. The parts are sewn together using a hand-blind stitch; this is very painstaking work.
- The last, creative stage of work. On it, the doll is decorated, acquires eyes, rosy cheeks, hair, and clothes. To create an outfit for a doll, you can watch master classes presented online. The most complex decorative detail is the hair. They are made by hand from threads, wool, artificial or natural curls.
A gift such as an interior doll will always be of great value, since the most scarce resource in our world is time, and a gift that you spend your time creating, filling it with creative energy and love, is an expression of your special relationship with another person . Interior doll
Video
DIY interior fabric doll with your own hands!
Why doesn't the doll work out? Basic mistakes
Reveal the doll's body
Doll stuffing
Sewing the doll's arms and legs
How to sew clothes
Tilda doll. Let's sew together. Mini master class
This article is unlikely to be of interest to the male half until they learn that the knowledge gained will be able to save money from the family budget on purchases new toy for my daughter. Nowadays it is difficult to find a child who does not know such popular dolls as Tilda, Hermine, Monster High, etc. All of them are very expensive, since they are products self made. This may be a secret, but it is very easy to sew a fabric doll with minimal sewing knowledge. Today you will learn how to sew a doll with your own hands, and also see patterns and photos for beginners.
Content:
We sew a doll with our own hands
The variety of textile dolls is huge, but they are all similar in design. Each product consists of three parts:
- The basis;
- Hair and face;
- Cloth.
For the doll you will need:
- 35 by 95 cm body fabric;
- hair yarn;
- floss threads for the face;
- 150 g padding polyester;
- scissors;
- sewing machine (you can sew by hand if you don’t have one).
Doll base

What to do:
1. Make patterns according to the example. Remember to add 0.5 to 1 cm to the seam.

Need to do:
- Head – 2 pcs.
- Torso – 2 pcs.
- Left hand – 2 pcs.
- Right hand – 2 pcs.
- Left leg – 2 pcs.
- Right leg – 2 pcs.
2. Fold the parts of the head with the right side inward and sew, not forgetting to leave an opening for the padding polyester. Do the same with the other parts.
3. Turn out and stuff the padding polyester.
4. Level the padding polyester evenly and sew up the holes.
5. Mark the seams on the neck. Insert the head into the body, turn it inside out, and sew in a circle. After this, remove the basting seam.
6. Bend the holes for the arms and legs inwards, place the parts there, and then sew them with a blind stitch in a circle.
7. Now you can start working on the face.
Hair and face

What to do:
1. Using floss threads and a needle, embroider eyes, eyebrows, nose, and mouth.
2. Take a smaller strand and sew it to the seam in the center of the head.

3. Now sew the long strands tightly together to cover the seam from the bangs.

4. Now you can do your hair. If you are not satisfied with the length or want to make fashionable haircut your doll, then this can be done at this stage.

Cloth

Before you start working on clothes, you need to decide on the material. Chintz, satin, and cambric are well suited for this work.
What to do:
1. First you need to cut out all the parts.
Working with chintz:

- Open out the bottom flounce 7.5 by 75 cm.
- Open the top flounce 4.5 by 45 cm.
Working with cambric:

- Cut out the piece from the above diagram with a fold along the dotted line (for the bodice) - 1 pc.
- Open out the parts with an allowance for the fastener (for the bodice) – 2 pcs.
Important! Remember to leave 0.5 cm of fabric for seams.

2. Finish and sew the side seams on all pieces.
3. Fold 0.5 cm from the bottom of the ruffle and sew.
4. Insert a thread into the resulting pocket and gather the bottom ruffle to the desired size.
5. Connect the bottom and top ruffles.
6. Sew the bodice to the resulting part.

7. Sew snaps or buttons on the back. You can decorate the dress with ribbons, buttons, sequins, etc. The dress is ready.

Handmade dolls are gaining momentum in popularity. They are perfect as a gift and interior decoration. In this article we will look at how to make dolls from scrap materials with your own hands.
You will need: steel wire, pliers, scissors, plasticine, newspapers, PVA glue, sanding paper, superglue, toilet paper, filler (cotton wool or padding polyester), threads, thin fabric, thick fabric (calico or felt), needle, acrylic paints, thin brush, fabric for a dress, pieces of fur, transparent manicure polish, satin ribbon for creating hair, velvet cardboard, lace, false eyelashes, a simple pencil, stacks, toothpicks.
Master Class
- Decide on the size of the doll and twist the wire frame, adding 8 cm to the length of the neck and 5 cm to the length of the arms.
- Mark the locations of the elbows and knees on the wire.

- Make a head out of plasticine and apply 5 layers using the papier-mâché technique. (Tear newspaper into small pieces, dilute PVA with water in a 1:1 ratio, dip a piece into the glue mixture and cover the head blank in a secret way. Each layer must dry before applying the next one).
- Cover the legs up to the knees using the papier-mâché technique.
- Wait for the head and legs to dry.

- Cut the head blank in half, take out the plasticine and glue the 2 parts of the skull together.
- Sand the parts of the legs and head until they are smooth.
- Mix PVA with water in a 1:1 ratio, grind toilet paper, then add to the glue mixture and mix well.
- Form facial features from the glue mass, cover the resulting forms with thin strips of newspaper, dry, then sand.
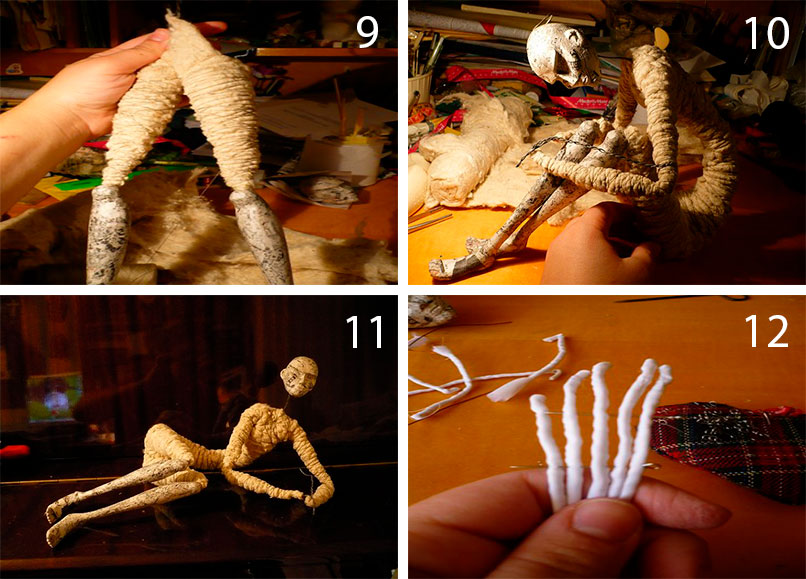
- Wrap the wire frame with filler, securing with thread.

- Prepare 5 pieces of wire and form the palm and fingers, then cover them with fabric.
- Make the other arm in the same way, then screw them on.
- Cover body parts with felt or other dense fabric.

- Paint acrylic paint head and legs.
- Cover part of the body from the waist to the knees, neck, shoulders and palms with thin fabric.
- Hem the sleeves and create a dress.
- Make a boa and muff from pieces of fur.

- Paint the doll's face and wait until it dries.
- Apply varnish to the face, head and lower legs from the knees.
- Create stockings for the doll and put them on.


- Glue the eyelashes.
- Make shoes from velvet cardboard and lace, then put them on the doll.
Interior doll

You will need: flesh-colored calico fabric, filler, cotton fabric for clothing, scissors, cardboard, satin hair ribbon, pencil, superglue, wire, thread, sewing machine.
Master Class
- Decide on the size of the doll and make a pattern on paper as shown in the picture. It indicates the number of parts (of each body part). Don't forget to take a 5mm allowance for allowances.
- Make the head in this way: cut out the front part of the head, then the back of the head. Fold the pieces inside out, sew them together and leave an opening for stuffing. Turn it inside out and fill it with padding polyester, then sew the hole.
- In the same way, create the body of the doll, and fill the neck area tightly with padding polyester so that it is solid.
- Create the arms and legs in the same way, just insert wire before stuffing so that the arms and legs can bend.
- Sew arms, legs and head to the body.
- Draw the eyes.
- Prepare a satin ribbon and cut several pieces of the desired length of future hair.
- Unravel each piece, leaving a margin of 5 mm.
- Glue the hair at the unraveled section. Do this process in rows using superglue.
- Sew clothes and shoes for the doll to your taste.
Basically, dolls are sewn using the standard method described above. The shape of the doll depends on the pattern, size and clothing. We present to your attention 6 beautiful patterns for creating textile dolls with your own hands, which you can view in the photo gallery.
Waldorf doll

You will need: beige cotton fabric, cotton wool, a skein of thread, thread with a needle, a centimeter, scissors, sewing pins, a piece of chalk or dry soap, yarn or floss, materials for sewing clothes and shoes.
Master Class
- Print out the pattern. It consists of the following parts: 4 parts of the arms, 1 pattern of the head and 2 parts of the torso combined with the legs.
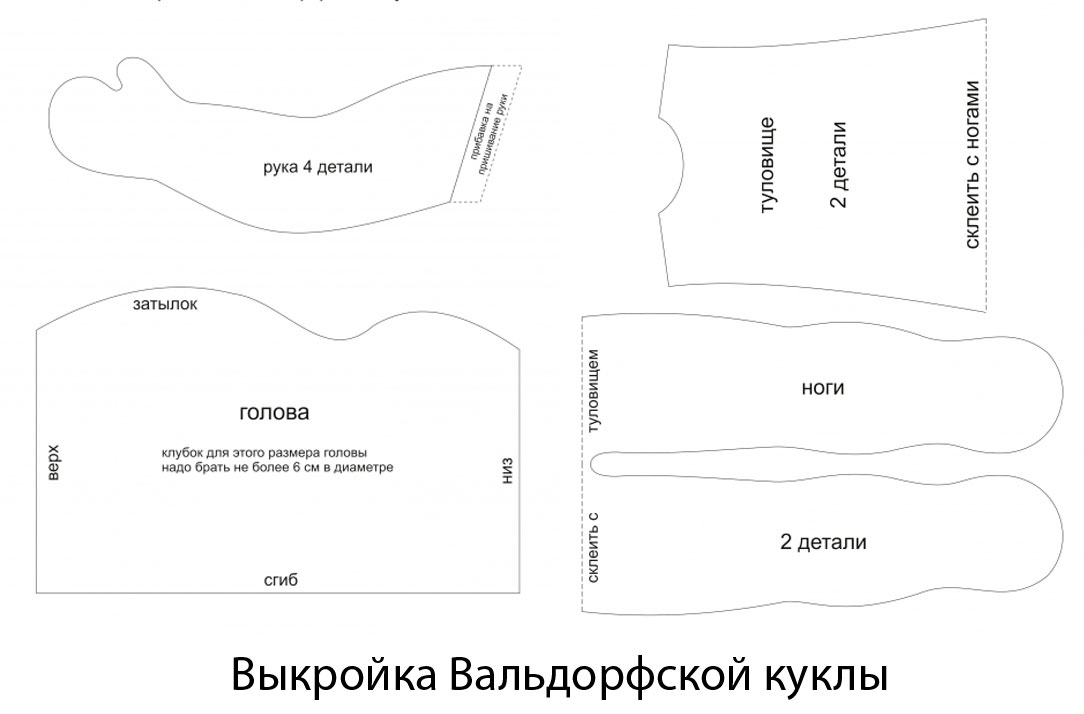
- When cutting parts, do not forget to leave seam allowances.
- Place 4 pieces of cotton wool of the same size and place a skein of thread in the center.
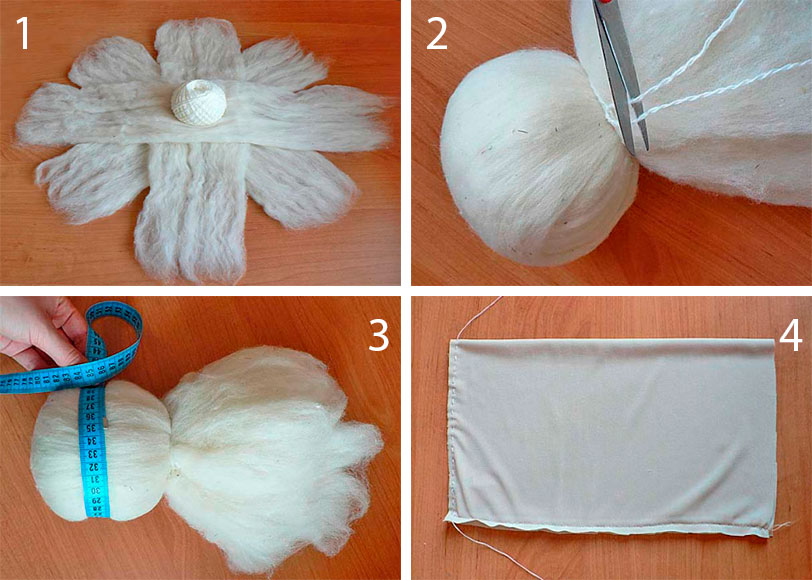
- Wrap the skein with pieces of cotton wool, tie with thread and cut off the tails of the thread.
- Measure the circumference of the ball.
- According to the size of the circle, cut out a rectangle of fabric, then sew the pipe and stitch the side. The side will be the bottom layer of the head on which the doll's facial features are formed.
- Pull the pipe up with a thread, turn the workpiece inside out and put it on the ball.

- Wrap the thread twice around the neck and tie on the side where the doll's face will be.
- Place the ends of the threads on the sides, then make a vertical draw and tie at the crown.

- Measure a long thread, twist it 2 times horizontally in the center of the head, then tie a knot near the vertical tie.
- Combine 2 yarn wraps with several stitches using a needle.
- Insert the needle into the center of the intersection, leave a few centimeters of thread near the same side and bring it out on the other side.

- Make a few joining stitches at the second crossing and leave a tail.
- Lower the threads down towards the back of the head near the ears, then tie them around the neck.
- Hook the back and vertical threads with a needle and pull them together. Repeat this process on both sides.
- Roll a ball of cotton wool and sew it on as a nose.
- Sew a head piece from the fabric along the top and side seams, then turn it right side out.

- Place the piece on the workpiece and pin off the excess areas with sewing pins.
- Remove the fabric and turn it inside out.
- Sew the seams where the pins are and trim off any excess fabric.
- Turn the part out and put it on the workpiece.

- Pull the thread in the neck area 2 times and tie.
- Pull the bottom edges of the thread seam first with the needle.
- Mark your hairline with chalk.
- Insert a thread with a needle at the intended growth line, stick it out through a centimeter and secure with a small seam back with a needle.
- Make an outer stitch back, bring the needle closer to the crown and secure the thread again.
- Repeat steps 23 and 24 in the opposite direction. This way you will get 2 hairs.

- Cover your entire head in a similar manner.
- Give the doll bangs in the same way, trim the haircut with scissors if necessary.
- Attach sewing pins to the eyes and mouth.

- Put the doll's head aside and start sewing the body.
- Transfer the pattern to the fabric and cut out the body parts.
- Sew the paired pieces together, then turn them right side out.
- Stuff your hands with cotton wool or other stuffing, then attach with sewing pins to the base of the head.
- Check the symmetry of the fastening by bringing the handles together in front.
- Remove the pins and sew on the handles using small stitches.
- Sew the seam allowances on the arms with coarse thread.
- Turn the body and legs inside out, then stuff the feet with stuffing.
- Sew the sides of the feet with a blind stitch.

- Stuff the legs with filling and sew a stitch forward with a needle on both sides around the perimeter of the top of the legs.
- Stuff the body with stuffing and pin it to the base of the head.
- Connect the elements with a hidden seam in the shoulder area and secure the torso around the neck with the same seam.

- Add filler to the body to make it more dense.
- Sew the remaining holes with a blind stitch.
Today I will tell you and show you how to sew an interior doll. I know that there are a lot of master classes on such dolls. But each master has his own techniques and his own tailoring features.
In this master class, I tried to explain in great detail how I do this. I think that this material is suitable even for beginners without experience. So let's get started. 
What we need:
Sewing machine.
Knitwear for the body, non-woven fabric, cotton, knitwear for clothing.
Boots for a doll, a hat for a doll, hair tresses.
White and beige threads, needles.
Filling: padding polyester and padding polyester. You can only use padding polyester if you can’t find padding polyester.
Large (long) needle for sewing arms and legs.
The glue is transparent.
Invisible needles or safety pins.
Scissors.
So, the first and most important thing is the pattern.
Here she is.


To sew the body you will need knitwear. You can buy knitwear that has almost no stretch. Most often it is found under the name “White Angel”. For my work I use the simplest knitwear from a fabric store. To prevent it from stretching too much, I glue it with non-woven fabric. I glue the fabric from the inside out, except for the place where the head will be. I fold and pin facing each other, outline the pattern, stitch, cut and turn. The parts are not completely stitched together. There are still places for turning and a place where the ball for the head is inserted. The next picture shows that where there are gaps, we do not sew the fabric.

This is what ends up happening.

A very important point! We cut out the body parts using zigzag scissors. If you don’t have these, then cut them out using regular ones and be sure to make small notches in the folds, for example on the neck. We just take this cut edge and carefully, not reaching the seam a couple of millimeters, trim it.
After we have stitched all the details, we need to finalize the legs. We take the leg, fold it in the area of the foot, as in the photo (seam to seam) and draw a rounded line.

Sew along this line. Cut it out. This is what we should get.


We turn the parts inside out using a wooden stick.

Let's get to the head. We will need a foam ball 8 mm in diameter. We cut out a circle from padding polyester, such that it completely covers the ball when wrapped.

We wrap the ball and insert it into the head through the space that is not sewn up at the top.

My dolls with a nose. If you don’t want to make a nose for your doll, then you can skip the next step. For the spout we will need a safety pin with a bead at the end, a piece of padding polyester, thread and glue. So, let's take a pin. Apply glue to the tip of the plastic bead. Wrap it with a strip of padding polyester. Then we fold this roll on the bead in half. We tie a thread around the base of this ball. This is what it looks like:
The necessary strip of padding polyester.

A roll wrapped around a bobby pin.

We folded this roll in half and wrapped it with thread at the base.

We mark on the face with an invisible pencil where our nose will be.

Carefully move the fabric aside and, at the place where the needle enters the ball, insert our nose and remove the invisible one.


Sew up the head.


Now the most crucial and difficult moment is the neck. For the neck you will need a wooden stick. I use Chinese chopsticks. I cut them and sharpen the end. You can use wooden skewers, but they are more brittle. I had a situation where such a skewer broke when I inserted it into the ball. You will also need a strip of padding polyester and glue.
We cut out a strip of padding polyester in a width equal to the length of the stick to the point, and the length is such that when rolled into a roll it will cover the neck approximately.

Lubricate the stick with glue and, starting from the end, roll the padding polyester into a roll around the stick - like a carpet. This is what you should get.

Carefully insert this roller into the body through the lower unsewn hole and prick our ball onto the tip of the stick. I’ll say right away that for a beginner it may be difficult to do right away beautiful neck. With experience it gets better and better.

We stuff the body with synthetic fluff. Carefully, in small pieces. Help yourself with a wooden stick. If you don’t have padding polyester, then you can use padding polyester, tearing and fluffing it into small pieces.

First we stuff the neck with a stick. We try to level everything so that there are no bumps.

After the neck is smooth and neat, you can stuff the body without a stick, using your hands. A very important point! The padding should be very dense and tight. This is necessary so that our doll can stand later. This applies to the torso, arms, and legs. Take your time, use small pieces. Large pieces give the so-called cellulite - an uneven surface of the doll.

Sew up the bottom.

We stuff our arms and legs using the same principle. There is no way to do this without a stick. Advice: first put boots on your feet, and then stuff them. This can again be done using a stick. We insert it into the leg and put it into the shoe. And then we stuff it. This will help the foot not to deform during padding and take the shape of the shoe. Sew up the holes in the arms and legs.

Let's start with clothes. We cut out pantaloons. Take the fabric. Place them facing each other. We draw our pattern on the fabric. Hem the top and bottom. And then we sew the top side seams. Like this:

We unfold and sew the bottom seams so that we get panties.

Turn it inside out and put it on the legs through the top. Like this.

Next, for work we will need strong threads, a long needle, buttons, a thimble and pliers.

We insert the torso between the legs. We fix it with safety pins, or better, if available, with long needles. And we sew it by button fastening the legs to the body. It's like this:

That is, you insert a needle into one leg and stitch it through the torso to the other leg. At the same time, you sew through the buttons on each side.

We put on our pants. We gather them at the back and sew them to the body. If they turn out to be too wide for the leg, then they can be gathered with a thread and sewn to the legs.

We sew a dress. It will consist of a separate top, skirt and sleeves. Sew the top part. To do this, we need to measure the circumference of the torso at the waist and the height of this upper part. In the following photos you can see that my girth is 21 cm and the height is 7.5 cm. For the allowance we add 0.5 cm in width and 2 cm in height.


So, we need to cut out a rectangle 21.5x9.5 cm.
And hem it on a machine on both sides along the width. Like this.

Then we make darts on both sides. To do this, we apply our cut to the body, wrap it and mark the fold of the fabric for ourselves. You can first draw a line and sweep it by hand. We sew one side. We do not sew it all the way, since at the bottom we have the length that we need. And it doesn't need to be reduced.

We apply it again to the body and in the same way mark the excess on the second side, which needs to be removed into the dart. We stitch it. We apply it to the body, secure it with pins and carefully sew the two halves at the back. This is what the top looks like:

Front view:

We sew a skirt. Everything is simple here. From the waist, measure the length of the skirt you need. Please note that if the skirt is full, it will look shorter. Cut out a rectangle equal in width to the length of your skirt + 2 cm for allowances, and as long as you want. The more, the more magnificent. For this doll, I made the length 45 cm. If one piece of fabric is missing, then you can sew two. So, we cut it out, hemmed the edges, and then sewed it into one circle. They gathered it along the length with thread and tightened it at the waist. Then they sewed it directly to the body. Like this:

This is my petticoat. Skirt top. I made it with folds. The technology is the same. Sewn on by hand.

Down you can wear a tulle skirt for fullness. To hide the seam, you can glue or sew braid or lace onto the belt. You can decorate the dress in some other way. Take action and be imaginative :)
I make the jacket from knitwear, but you can use cotton or denim. In this example, I used jersey and cotton for the lining. We cut the fabric facing each other. Let's draw a pattern. We don’t sew all the way through. We turn it inside out through the hole and sew it up by hand.

We attach our jacket to the doll and secure it with pins. We sew it in the center. Decorate with a button or something else. You don’t have to sew it, then it won’t be fastened on the doll.

Sew the bottom on a small rectangular piece of knitwear. We chop off the face and draw the sleeves. I place my pens on the fabric and mark where I want the sleeve to go.

We sew it, turn it inside out and put it on our hands.
We sew the arms in the same way as the legs, using button fastening.

The last stage is the hair. Hair can be made from artificial tresses or from natural sheep curls. You can also use yarn or wool for felting. Today I will tell you how to make hair from tresses.
What we need are tresses, transparent glue, or a needle and thread, safety pins, and a comb.
There are two options. The first one is to glue the tresses with glue, the second one is to sew them with threads. For beginners, I recommend the second option. It is easier. I'll show you how to glue the tresses.
Draw a line around the head with a simple pencil. Squeeze out a small layer of glue along this line.

Apply the base of the tresses to this layer and secure with pins. The pins are only needed for a few seconds for the glue to set. When I glue the second row, I already pull out the pins from the first.

Next, squeeze out another layer of glue next to it in the same way and glue another row. There is no need to cut your hair. This is done in a spiral.
Do the same for the third row, etc. Until the tress runs out. It turns out like this.

You can sew tresses to your head in the same way using threads in a spiral. It will take a little longer, but your hands will be clean from glue :)
We draw the eyes with acrylic paint and blush the cheeks with regular blush.


