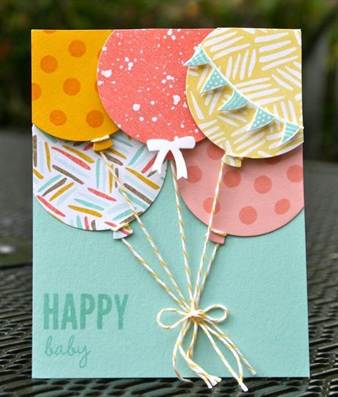
We decorate the room for a children's birthday with our own hands. Interesting DIY gifts DIY crafts for birthdays
Find out how to give a gift to your mother, grandmother, father, grandfather, daughter. Find out what and how to give a cool birthday gift to a friend.
The content of the article:
Everyone has a birthday. So that family members, friends, and co-workers do not have any unresolved questions regarding what to give to the birthday boy, check out the options presented. Then the child will know what to give to mom and dad, not only for this event, but also on March 8, February 23, and adults will decide what to give to a friend, loved one, friend.
How to give a gift to your mother and grandmother?
Of course, any parent is pleased when her beloved child makes it with her own hands. She will keep such a personalized card for a long time and joyfully remember how the child presented it on her mother’s birthday.

To make a postcard you will need:
- colored paper;
- pencil;
- glue;
- colored cardboard;
- scissors.
The son or daughter will decorate the wrist at their discretion with pieces of colored paper, gluing them to the hand. Now you need to glue the flowers to the front side of the card, tucking your thumb under them, and place the rest on top of the bouquet.

Here is a gift you can make with your own hands to a child for his mother, like the next one.

Draw a mug on cardboard, then cut it out and decorate it with flowers from colorful paper. Cut out other flowers from it; they need to be glued to the back of the mug. Even small children can make this application.
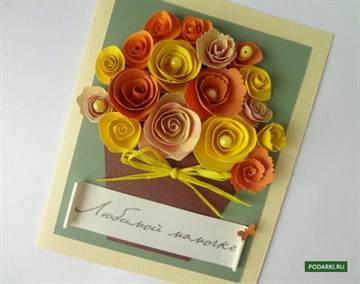
In general, flowers are a win-win handmade gift for mom. Therefore, a child can make a bouquet of tulips from colored paper and give it to her or grandma. The scheme for creating such a flower will certainly help with this.

It will not be difficult for older children to twist such flowers from colored paper.

First you need to cut a square out of it, then fold it along one, and then along the second diagonal, fold it so that you get a double triangle. At this stage, the workpiece will turn out exactly the same as when creating the tulip in the fifth picture. These paper color schemes are presented just above. Now you need to wrap the first corner of the resulting triangle on a rod or thin stick, then the second, third and fourth edges.
When twisting the petals, pay attention that they need to be wrapped in one direction.
Make 3-4 such parts, glue their edges together, leaving a small hole. You need to put a wooden stick painted green into it, and the gift for your mother is ready.
Fabric flowers will also become a bright accent on this holiday. If you have a piece of felt or an old coat, give your child a chance to express their creativity. To make such a flower from fabric, you need to cut a circle out of it, which will become the core. Petals are glued to it. For them you need to cut the felt into triangles. Having slightly trimmed the lower opposite corners, they need to be aligned and glued.

Gift for grandpa and dad
By making it, the child learns the basics of origami. Let him roll up a shirt from paper and present this gift to the birthday boy or man on February 23rd.

We start creating a gift for dad or grandfather by taking a rectangular sheet of paper, bending it in half to mark the middle. We will need it, because we need to pull the right and left edges of the sheet to it.
We make the collar of the shirt, bending the upper right and left corners to designate the sleeves. In Figure “7 a” you can see what should come out of this. Fold the bottom up, pulling it up toward the collar. The result is an origami shirt. All that remains is to decorate it. You can glue a pocket, cut a tie out of paper, and give a birthday gift to your dad or grandfather, made with your own hands.

A souvenir photo will also be a wonderful present. Let your son or daughter make a photo frame with their own hands. For it you will need:
- red, white, yellow, black cardboard;
- scissors;
- glue;
- pencil.

First, the necessary elements of the machine are drawn on the back of the cardboard. If difficulties arise with this, enlarge this photo and redraw it on tracing paper, and then on cardboard. Next, white glass, black wheels, and yellow headlights are glued onto the red car. Photos are attached in the same way. On the number plate you need to write to whom the gift is addressed.

My daughter can quickly sew a funny kitten from an old sock and give it as a gift. For this you need:
- sock;
- padding polyester;
- threads;
- needle;
- scissors;
- pencil or pen.

Matches gift for a friend
If you want to give a cool birthday gift to a friend, then make a star or snowflake from matches. This is completely waste material, because usually such used items are thrown away.

Draw the shape of the future gift, cut out a cardboard blank based on it. Now you need to divide the star into segments with matches and lay out the first sector with them.
To make the job easier, coat a small area of cardboard with glue, then place several matches tightly together. Press them lightly with your hand for a better fit.
Cover all the cardboard this way, and you can go visit and congratulate your friend on his birthday in a fun way. If your friend is unlikely to appreciate such a joke, then you will have to spend money, but very little, only on:
- a piece of dense fabric - felt or felt;
- pencils - set of 24 pcs.;
- decorative cord.
Felt is a hard material, so it is better to first soak it in hot water and then dry it. It will become softer and more pliable for work.

Step back 1 cm from the edge of the felt, make 3 thin cuts parallel to it, into which insert a leather cord folded in half. You managed to make a birthday present with your own hands. All that remains is to insert the pencils, roll the felt into a tube, tie this scroll on a cord and give it to the birthday person, for example, a classmate, work colleague or friend.
Interesting DIY gifts for your loved one
You can make such a gift for both a friend and a dear loved one.

For it use:
- cardboard;
- wrapped candies;
- 1 large and 6 small chocolates;
- braid;
- glue;
- white threads or fishing line.
Place 6 small chocolates on the neck of the guitar as in the photo, on top of them place “strings” from cut identical fishing lines or threads. On one side, secure them with a large chocolate bar, gluing it behind the wrapper. On the other side there will be 3 candies, under which tuck the opposite edges of the threads.
Now all that remains is for your loved one, relative or friend to frame the guitar with candies in 2-4 rows, gluing them.
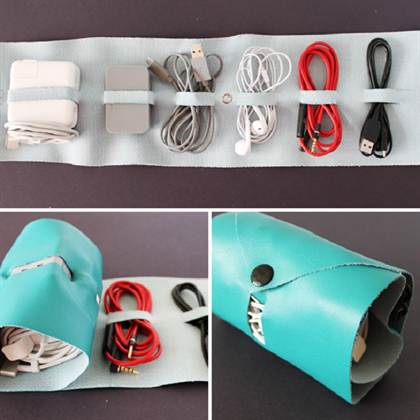
The next gift to your loved one, made with your own hands, will help him never lose his ballpoint pens. Such a gift will remind him of you at home or at work if he takes it to the office and puts it on his desk.
For this gift you will need the following:
- 6 cork coasters for hot dishes;
- pencil;
- glue;
- drill and drill for it;
- and pens for gifts.

If you wish, you can apply paint to the gift using a spray can or leave it as is - it looks very stylish.
What can you give your friend for her birthday?
The next gift can be made not only for her, but also for mom, dad, loved one, friend - it all depends on the age of the donor and the preferences of the person receiving the gift.

This original hedgehog will exude an intoxicating aroma consisting of the smell of coffee, lemon, and cinnamon.
To make it we will use:
- plastic ball;
- coffee beans;
- cardboard;
- leg-split;
- scissors;
- dark brown paint;
- brush for painting;
- beads for the nose and eyes;
- glue gun;
- dried lemon slice;
- cinnamon;
- a piece of polystyrene foam or 2 cotton pads.
Cover half of the ball with brown paint and let it dry. Now wrap the twine around the hedgehog’s face and, if you wish, also around its abdomen.
We begin to glue the coffee beans, placing them close to each other, slightly tilting them in the other direction from the hedgehog’s nose.
To make a gift for a friend look beautiful, glue the grains first from the center of the animal’s body towards its hind legs, and then from the same middle part to the muzzle.
Then glue the lemon and cinnamon sticks to them, and secure the beads as the eyes and nose in the same way. The fragrant gift is ready. The video at the end of the article shows in detail how to make it yourself.
Speaking about what you can give to a friend for her birthday, on March 8, or just because, you can tell how to make a beautiful hair tie with your own hands.
To do this, take the following materials and equipment:
- elastic band;
- yarn and hook or fabric;
- scissors;
- glue;
- a large button on the leg.
Glue this circle to the button, folding the edges. All that remains is to take a matching elastic band, tie it on the leg of the button, and you can give a gift to your friend, made with your own hands.

She will probably like this original necklace too.

Cut the collar from the shirt, fold its lower edges inward, and stitch. Rip off the placket along with the collar, on one side of which a button is sewn, and on the other there is a slotted loop for it. These parts are used to fasten the collar around the neck. Hide the button under the decorative piece that is sewn to one side of the collar.
Gift for daughter
It’s good if it’s customary in the family to make them yourself. Raise your children in a creative environment. Present a beautiful stroller and doll that you will design and make yourself. If you are invited to a girl’s birthday party, you can put a banknote in the doll’s hands.

Here's what you need to get started:
- colored cardboard;
- compass;
- scissors;
- ruler;
- tape measure;
- pencil;
- lace;
- braid;
- glue.

Now glue two semicircular parts of the stroller with a strip that is placed between them.

Cut out the wheels from black paper, and let the rims for them be the same color as the stroller itself.

To make sure she likes your daughter’s birthday present, decorate the stroller with braid and glue it on.

For the doll, sew a skirt and a bell hat from lace. Attach the satin ribbons to the cap using a glue gun.

These are the kind of gifts, lovingly made with your own hands, that you can give to a loved one, thereby once again showing your wonderful attitude.
Watch the promised video right now and feel free to start creative work:
![]()
In modern stores it is not difficult to buy a gift for every taste. However, DIY birthday crafts can become an original and sincere gift to a loved one. Plus, making homemade gifts is fun and interesting. Beautiful crafts as gifts can be made from different materials. It is worth considering the age of the recipient and his personal preferences. After all, a gift to an older person should be significantly different from a gift to a peer. What can you make yourself and what do you need to prepare for this?
The article contains the best gift ideas for family members and friends.
What can you give?
There are a lot of ideas for gifts and their design, and sometimes it’s easier to show your imagination in creating a present than to decide what exactly to give. Among the most popular gifts that you can make yourself are:
- designer postcards in various techniques;
- Photo frame;
- original notebooks;
- caskets;
- candles and candlesticks;
- interior vases;
- unusual pillows and decorative toys;
- mugs.
A postcard is the simplest gift, which at the same time provides a large field for creativity. Everyone loves to receive postcards with nice words, regardless of age and status. The only thing worth considering is that the design of the card must match the birthday person. For example, if this is a card for a man, then it can be designed in the form of a shirt, tuxedo or decorated with ties. If this is a card for a woman, then it can be decorated with flowers and other “feminine” items - a hat, dress, beads, lipstick.


The postcard can be decorated with various materials and objects - fabric, lace, leather, accessories, dried flowers, etc.

In addition to cards, you can make many other gifts from paper, for example, in origami style or using the quilling technique. Even a beginner can fold a flower out of paper or decorate a box with rolled strips of paper.

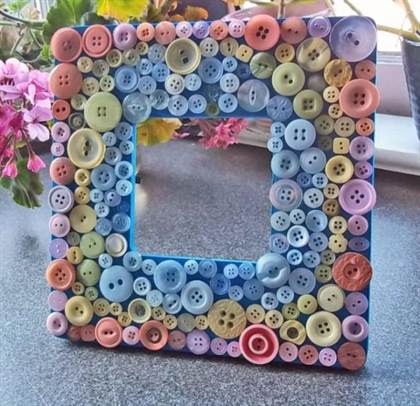
You can also experiment with a photo frame. To do this, just stock up on a ready-made wooden frame (cut it out of cardboard), a glue gun and the necessary materials for decoration. The frame can be painted and painted, decorated with decoupage or covered with shells or buttons.

You can also decorate boxes, candlesticks, vases and mugs. Craftswomen who love to sew can easily make textile interior items. The main thing is to use ideas and show a little imagination and skill.

To each his own
Each family member should have their own gift. Let's try to figure out which birthday boys will like what.
Dad with a mathematical mind will love the unusual Rubik's cube, which will remind him of pleasant family moments.
For the craft you need to prepare:
- Rubik's Cube;
- any photographs (6 pcs.);
- scissors;
- glue.
How to do:
- Remove the colored stickers from the puzzle (the colored cube can be left untreated);

- Select photographs according to the size of the cube and cut them into 9 squares, matching in size with the squares on the edges;
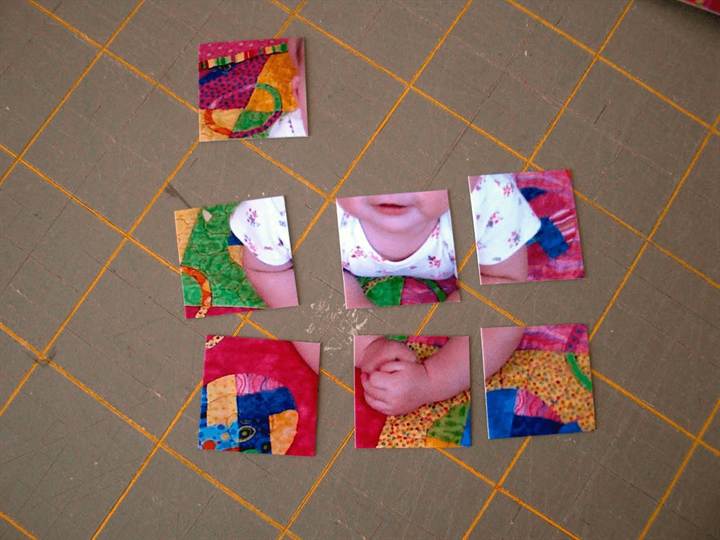
- Carefully spreading the edges with glue (you can use a brush), glue all the squares on all the edges.
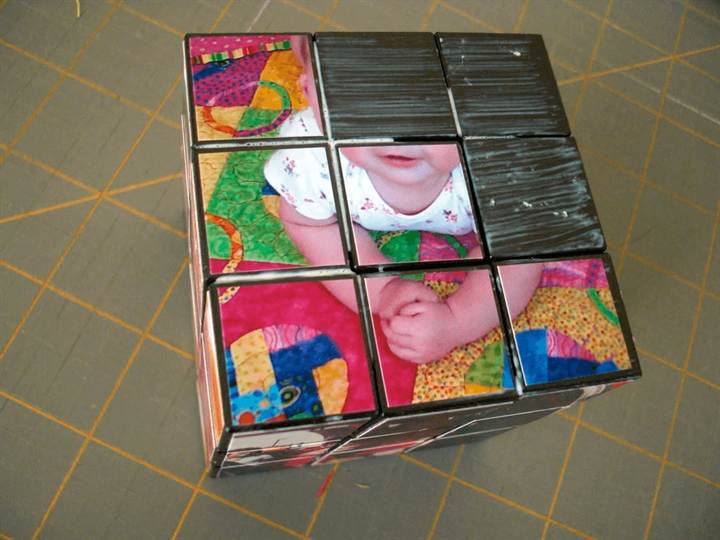
After drying, the cube can be used for its intended purpose.

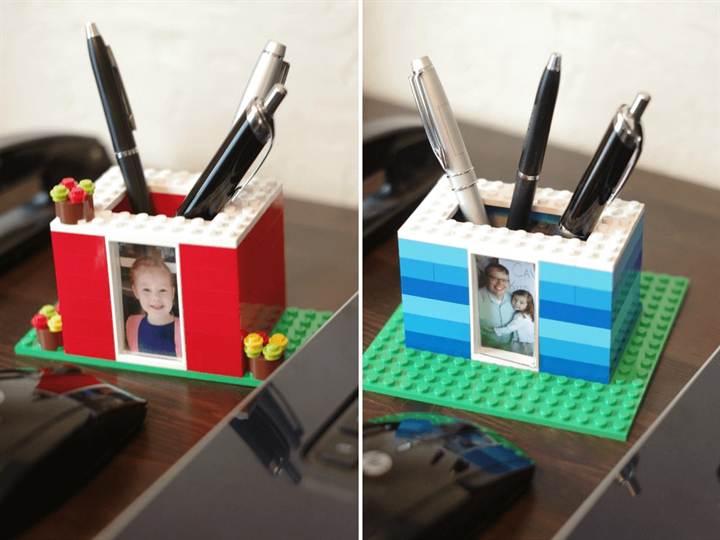
A father can receive a pen holder made from Lego from his son or daughter. The kids will practice assembling figures from the construction set, and dad will always remember whose gift it was.
If you plan to give a bottle of alcohol as a gift, then you should take care of its design. For example, you can use sleeves from old shirts.


You can give your mother a case for an iPad or iPhone made of genuine or artificial leather. Such cases will not only protect equipment from damage and scratches, but will also emphasize the status of a business mother.
You can take leather from an old bag or briefcase. According to the size of the gadget, taking into account the allowances, cut a rectangular piece of material so that the gadget can be wrapped in it twice. All that remains is to make holes along the edges at equal distances with an awl or a stationery knife and sew the cover along them with lace or twine. To close the cover, sew a button with a drawstring loop on top. The gift is ready!

The case will be complemented by a beautiful flower card. It can also be presented to other women, for example, as a gift to a friend or sister.
You need to prepare:
- double-sided colored paper;
- scissors (can be curly);
- skewer, toothpick or awl for quilling;
- PVA glue;
- base for the postcard (cardboard or thick paper);
- double sided tape;
- ribbons and beads.

Progress:
- Cut out circles of different sizes from colored paper;
- Starting from the edge and moving towards the center, cut out a spiral from each circle (you can make the edges wavy);

- Using an awl, toothpick or skewer, twist the resulting spirals into flower corollas;

- Cut out a trapezoid - a vase - from dark paper;

5. Glue a background to the card, and a vase and flowers on it;
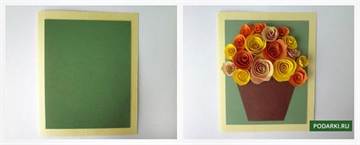
- Decorate the card with beads, ribbon, and inscription.

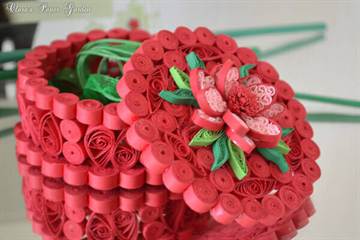
Grandma will certainly love the box in which you can collect various little things. You can buy a blank and decorate it to your liking, or you can make the box yourself. For this you will need:
- thick cardboard or other base;
- toothpicks;
- yarn;
- PVA glue;
- heart-shaped template;
- glue gun;
- beads or other decorations.
Progress:
- Cut out the bottom of the box from cardboard according to the template;
- Stick toothpicks into the cardboard around the perimeter, use glue for better fastening;
- Start wrapping the toothpicks with yarn, alternately going around them from the outside and from the inside;

- Braid to the end, tie the end on the last toothpick and hide it inside;
- Place a small bead to match the yarn on the tip of each toothpick (to secure the weave);
- Decorate the box with beads.
The gift from my granddaughter is ready!
If desired, you can make a lid by also cutting it out of cardboard and wrapping it with thread.
Grandpa will likely appreciate practical items that he can use every day. A good idea is a glasses case made from an old tie or scarf. To do this you will need thread and a needle, Velcro, fabric glue, scissors and a tie. The main thing is to correctly determine the length of the case so that the glasses fit in it and at the same time it can be closed freely. The finished case can be decorated with buttons.

You can also give the older generation a general gift - a family tree on which photos of all family members will be placed. There are a lot of options for “family trees”. Various techniques will be useful here, including quilling, applique, and dot painting.


The younger generation can make fun and cool crafts with their own hands. This could be original jewelry, toy pillows, topiary made of sweets, or simply unusual packaging.


A brother who loves Star Wars will surely love a watch with characters from the film. To do this, it is enough to prepare a base for a clock with a hole in the middle (you can make a plate out of clay or plaster), a clock mechanism with hands, a glue gun and Lego figures from the corresponding Star Wars set.
First you need to paint the base and then attach the clock mechanism. Using a gun, glue flat Lego pieces as a dial. After drying, attach the figures to them.


Video on the topic of the article
Gift ideas can also be found in the video.
Making any craft is quite an exciting activity, probably not only for any child, but also for an adult. Depending on your imagination and skill level, you can create a real work of art. But even if you are just mastering some technique, you can still make beautiful crafts with your own hands. A birthday gift made by yourself will leave few people indifferent.
Below we will show you how to make DIY crafts for a birthday that will be accessible even to a child.
Ads related to the request
Homemade box
1) Take thick cardboard and cut out the shape of your future box (you can sculpt the bottom from clay or plasticine, fill it with plaster).
2) Insert toothpicks into the base along the entire perimeter at the same distance (about 1 cm from each other). If you are using plaster, you need to insert the toothpicks while it is still not completely hardened, but already thick enough to hold them in an even position.
3) Take the yarn of the color you like and begin to braid the toothpicks row by row according to the principle of weaving from a vine, alternating the thread from the inside and outside.
4) Decorate such a box as your imagination tells you. These can be beads, ribbons, small animal figures.
5) If you use a cardboard or clay bottom, cover it with beautiful fabric or sew a beautiful pillow inside.
6) To increase the durability of such a box, you can coat it on both sides with acrylic varnish.
Kitchen apron and potholder
1) Take regular white fabric and a pattern for an apron and potholders (you can transfer them from ready-made ones).
2) Paint them with special paints for fabric; if a child is making such a craft, then a good option would be handprints, which can easily be turned into tulips by adding stems and leaves to them.

Sweet gift for a child
To make such a craft you will need sweets, skewers, a flower pot, polystyrene foam, and artificial moss.
1) Glue the sweets to the skewers.
2) Fill the pot with polystyrene foam (it should be one “piece”), you can use polyurethane foam for these purposes.
3) Cover the top of the pot with artificial moss.
4) Place skewers with sweets throughout the pot as your imagination tells you.

DIY crafts for mom's birthday
There are many gifts that a child can give.
Photo frame made of wax crayons
1) Take a shallow candy or pizza box.
2) Cover it with beautiful paper, but the top of the box must be white.
3) Trim the crayons about halfway and stick them to the top of the heart shape.
4) Cut out the middle that is formed by these crayons (this will be your frame).
5) Take a hair dryer and start heating the crayons towards the edges. They will begin to melt and create an amazing original pattern.

DIY postcard
Even a kindergarten-age child can make such a card. You can decorate it with applique or the child’s own hands, transferred to paper.

Of course, an easy DIY craft for a birthday will be an excellent addition to the main gift. Such crafts include envelopes for money in origami style or decorated using the quilling technique, bouquets of flowers, and small souvenirs.
But you can make large birthday crafts with your own hands, which in themselves will be an excellent gift. Moreover, this does not mean at all that it is necessary to have any specific knowledge and skills. You just need to use your imagination a little.
Below we look at examples of such gifts...
Box for small items
For this craft you will need an egg container and... your imagination. So let's get started
1) Take a container and cover it on all sides with papier-mâché. The inside can be left as is, but the lid must be coated on both sides. We wait until it dries completely. Be prepared that this will take about a week.
2) We prime our future box (you can use PVA glue diluted with water instead of a special primer).
3) Now let's start decorating. Use your imagination here. As an option, you can lay out a design from... pasta, fortunately, there are all kinds of forms of these products on sale. You can glue the pasta using the same PVA or a glue gun.
4) If you decide to decorate with pasta, then such a box will need to be varnished to make it easier to care for and prevent mold from appearing on the pasta. 
Birthday cake
Lately, you won’t surprise anyone with all kinds of cakes made from diapers or baby things, but you can try making an original cake from corrugated paper. It is made using the corrugated tube technique.
1) Make the frame of the future cake from thick cardboard, you can use a ready-made box. But two- or even three-tier cakes will look most original.
2) Let's start making corrugated tubes. To do this, you need to cut the corrugated paper into 15x25 cm rectangles (cut a 15 cm strip from the roll and cut it in half). Place two thick knitting needles along the long sides of the paper and start winding the paper on them. The knitting needles should “meet” exactly in the middle of the rectangle. Turn the knitting needles over onto the stops, holding them vertically up and, starting from the bottom, begin to gently pull the paper down with your fingers until the entire rectangle forms a kind of accordion. Make sure that this corrugation is not too tight. 
You will need to make enough of these tubes to cover the entire frame of the future cake.
To diversify the design, some of these corrugated tubes can be made single. They are made in exactly the same way as double ones, only the rectangle is cut in approximately half and wound onto only one knitting needle.
3) Now all you have to do is cover your cake with these tubes, placing them vertically and alternating colors in the pattern of your choice. You can glue either with a gun or with regular PVA or a glue stick. Make sure that the tubes do not extend beyond the edges of the tier; if necessary, they can be easily pulled to the desired size or the excess can be trimmed.
4) You can decorate as desired. A good option would be to frame each tier with slightly curved crescent-shaped corrugated tubes glued horizontally on top of each tier.
5) When moving on to decorating the next tier, do not forget to glue the lower, wider part of the cake on top to cover the frame.
6) The top of this cake can be decorated with flowers made from corrugated paper and paper candles.
It should be said that for such crafts it is necessary to take thick paper with large corrugation, then the cake will look airy, as if made from marshmallows, and will leave few people indifferent.
In general, using the corrugated tube technique you can make not only tubes, but also figurines of animals, birds and other crafts.
For example, it is very easy to make a figurine of any animal by rolling up a ball of paper for the head and gluing it to the body from a roll of toilet paper. Then all you have to do is cover the resulting shape with corrugated tubes of a suitable color.
And again the box...
You can make a rather interesting box by covering a ready-made or home-made box with wooden skewers and varnishing it. Decorate the joints with satin ribbon or in any other way you like. Such boxes are not only durable, but also very functional, and if you take a box made of very thick cardboard (for example, a shoe box), then even quite heavy things can be stored in such a box.
The inside of the box can be lined with fabric or covered with velvet paper. If you are making a box for jewelry or women's small items, then you can glue a small mirror on the inside. The lid can be made either separately or folding, this is not important here, be guided only by your taste and capabilities.
You can decorate the front side of the lid with matching satin flowers or, conversely, with contrasting ribbon and beads.

But what are we all talking about moms... Let's not leave dad without a gift, but for this we will give him
Pirate ship
1) From foam plastic we cut out three blanks for the ship, each 5 cm high, and another bow part, up to approximately 1/3 of the length of the finished ship. On the top piece we draw a shape in which the gift will lie (for example, a bottle of expensive cognac) and begin to cut out a recess for it so that it fits completely inside.
2) Use fine sandpaper to remove all irregularities on the outside and in the recesses.
3) We cut out another stern and bow part, as well as a superstructure on the deck from a piece of foam plastic.
4) Mark the attachment points for the lower part of the ship and the inside of the upper part. Then we fasten them with wooden “chops” for furniture. We glue the remaining parts using double-sided tape.
Don't forget that the bottom should be removable so that the surprise gift can be easily taken out.
5) Now, using a knife and sandpaper, we begin to give our workpiece the shape of a “full-fledged” ship. Carefully ensure that there are no gaps between the polystyrene foam and that they do not fit tightly together, and also that there are no irregularities. Don't be lazy when sanding.
6) The rough work is done. Now, first you need to cover the recess for the gift with velvet paper or a beautiful fabric, and the entire lower removable part of the ship with black corrugated paper. Separately, we cover the entire upper part of the ship with the same paper, without disassembling it into separate plates. We draw a waterline using a contrasting cord and emphasize the deck by gluing the same cord along the top of our ship.
7) Using toothpicks inserted around the perimeter of the entire vessel, we make railings (chains can be hung between the toothpicks), and from skewers or thick wire we make masts, onto which we attach sails from the same corrugated paper.
8) It remains to fill the stern with “rigging”; you can use sweets as it, which will go in addition to the hidden cognac.
9) We attach a triangular sail to the bow. And... the ship is ready. It is unlikely that such a ship, made with love, will leave your beloved man indifferent.
If cutting out the base for a ship seems difficult to you, you can make it using the modular origami technique; detailed master classes for this technique are quite easy to find in the public domain. 
Ladder of success
Another original handmade gift for your man...
To make such a staircase, you need to take foam plastic, cut it in the shape of a circle (several of these blanks will be required), glue the blanks on top of each other and cut out a recess for a gift bottle.
Cover the base with corrugated paper or fabric, decorate the sides with ribbon or cord (do not forget to cover the recess from the inside).
Take thick cardboard or planks and make a spiral staircase out of them, making stands out of wire. Cover all this in the same way as the base.
“Drown” the racks in the foam, securing them with hot glue for reliability.
On each ladder, place a small chocolate bar wrapped in a banknote (preferably a real one). If desired, you can sew a tailcoat on the bottle from bias tape. The voids in the base can be filled with bags of “fake” bills and chocolate coins, gluing them to corrugated paper or in another way you like.

As you can see, with a certain amount of imagination and desire, you can make an unforgettable craft with your own hands, matching it to any life situation. All this looks impossible at first glance, but, as they say, once you start, you won’t be able to stop. It is known that the most difficult thing is to take the first step.
And over time, many manage to turn their hobby into a fairly profitable business, because handmade work will never go out of fashion and the demand for it continues to grow every year. So think about it, maybe you are on the verge of something big.
You always want to give your family and loved ones a special gift for their birthday, and what could be more pleasant than receiving DIY birthday gift, into which the donor invested a piece of his soul. Let's look at several options that are suitable for gifting to relatives, colleagues or friends.
DIY birthday gift master class
First, let's learn how to make a sweet bouquet from corrugated paper; this is the most versatile option; you can give it as a birthday present to a colleague, school teacher, or beloved friend. It’s not at all difficult to make, but it looks very attractive, and who doesn’t like sweets.
For work we will need the following: chocolates, preferably round ones or truffles, it is easier to form the correct shape of a bud from them, bamboo sticks, corrugation of coffee beige, cream colors, film for wrapping bouquets or corrugation of a suitable color, ribbons, thin tape, office glue.
If you want to make the bouquet brighter, you can take paper of any matching colors. To make a flower, you need to prepare the petals; to do this, cut out identical rectangles measuring 5.5 cm by 7.5 cm in all colors. We round the upper edges; this is easier to do with a pencil or other cylindrical object. We stretch the middle of each petal a little so that it becomes convex. Candies need to be secured on bamboo sticks. Now you can start assembling the flower: wrap the candy with the prepared petals, go from light to dark, or you can vary the position of the petals from flower to flower. We fix the bud with tape, decorate the improvised stems with a thin strip of corrugation, grease the end of the strip with glue, and begin wrapping each skewer from the bud down. All that remains is to decorate the bouquet with packaging film or corrugation, and tie the finished bouquet with ribbons. As you can see, there is nothing complicated, and the result will really please the birthday girl. If you want to congratulate your grandmother, invite your child to make a greeting card, ideas on how to design it.

Now let's see how to design. We will need almost the same materials as in the first version; we will make a gift heart with sweet tulips. It is important to choose a beautiful box with a lid for the craft; it does not necessarily have to be in the shape of a heart, you can take a round one or any other shape. We cut out the foam to the shape of the box, put it inside, and we will insert skewers with tulips into it.

To assemble one tulip you need to make 3 petals; to do this, cut out three identical strips measuring three cm by 14 cm from scarlet corrugation. Twist each strip in the middle and bend it in half. We slightly extend the middle of the future petal so that it becomes convex. We will use candies as the basis for the bud; it is better to take large ones. We place the petals around the candy to secure it using wire or thin tape. To make the flower look neat, trim off unnecessary edges. How many tulips you need to prepare depends on the size of your box; they should be located close to each other.

Before filling the heart, you need to decorate the sides; to do this, cut a strip of contrasting corrugated paper so that it is enough to wrap the entire perimeter of the box. Fold the strip lengthwise so that its width is equal to the width of the side of the box. The fold will serve as the top edge; to make it look nicer, you need to slightly stretch the paper along the fold. Using a glue gun, fix the paper to the inside of the box. Agree, the box looks much more elegant this way.

We place each tulip on a skewer or toothpick and then stick it into the foam. Try to place the flowers as closely as possible to each other so that the foam does not show through. We decorate the composition with leaves either from artificial flowers, or you can cut them out of paper. You can complete the decor by gluing a butterfly or dragonfly to one of the tulips. You can glue a card with congratulations to the inside of the lid for the hero of the occasion. The finished heart looks very cute and touching; you can give it to your beloved mother or vice versa to your daughter. If the idea of sweets doesn’t suit you, you can decorate a beautiful money tree as a gift, see how to do this in ours.

Now let's make it sweet DIY birthday gift for a child, the bouquet will not be so interesting for a little sweet tooth. Therefore, we will make a topiary from candies. I just want to point out right away that you shouldn’t leave your child unattended so that he doesn’t overeat too much sweets. These topiaries are perfect for decorating a sweet table at a birthday party.
To prepare topiary, you need the following ingredients: lollipop or other candies on a stick, sugar mastic, colored sugar sprinkles, ribbons and a base in which we will fix the stick, these could be thimbles and walnut shells, perhaps you can come up with your own version.
The first thing you need to do is fix the lollipop in the base; if you have a thimble, then fill it with plasticine and simply stick the stick into the plasticine. If you have nut shells, you will have to ask dad to drill a hole in them with a diameter approximately the thickness of a stick. Then we fill the shell with the same plasticine, turn it over and stick the candy into the drilled hole.

Now you can start decorating the topiary itself; you need to remove the wrapper from the candy. Roll out the mastic thinly, cut off a small piece, and wrap it completely around the entire candy. Pour the colored sugar sprinkles into a plate and carefully roll the resulting mastic ball in it, all that remains is to decorate the lollipop stick with a beautiful ribbon and the topiary is ready. Using the same principle, you can make not a ball, but sculpt funny little animals from mastic, this is also very simple to do, with such original crafts you will greatly delight the little birthday boy.
Agree that you also want to give a colleague or beloved man unusual DIY birthday gift. I would like to present you with several original options. It would be a lie to say that men don’t like sweets, but giving a cake is too banal, but if you design a gift based on the recipient’s hobbies, that’s a completely different matter. The computer game “Tanks” is very popular among modern men. Let’s surprise your man with a gift in the form of a tank. For work we will need: A couple of unnecessary boxes of different sizes, various wrapped candies, a bottle of alcohol (cognac, rum or whiskey, the choice is yours), scissors, double-sided tape, toothpicks or bamboo skewers, green or other suitable color wrapping paper.

The boxes can be taken from under anything, the main thing is that in the end one is a little larger than the other. They are needed to make the basis of our tank - the tracks and the turret. I had a shoebox and a blood pressure monitor, so I cut the shoebox into two halves and inserted one into the other to make a square. On one side we need to cut a semicircular hole, where we will later insert the bottle - the barrel of our tank. Boxes need to be covered with paper on all sides. Now we glue the armor onto the tank using double-sided tape - candy. We wrap the bottle in decorative paper and place it on the tower; real or souvenir banknotes can be placed as a banner on the tank using skewers. I am sure that with such an unusual gift you will pleasantly surprise any man, even your boss.

If the birthday boy is interested in music or plays the guitar himself, we have another great option. Let's make an unusual guitar out of chocolate. In addition to chocolate (I used kinder), you will need thick cardboard and thick threads. Depending on the size of the cardboard you managed to get, you may need a different amount of chocolate, ideally it is better to make the guitar in natural size. On a sheet of cardboard we draw the silhouette of the future guitar; we will need two such parts. The guitar should be three-dimensional, so we cut out a strip for the end from the remaining cardboard. You can make the entire guitar the same thickness, it’s much easier, but in general it’s correct to make the neck of the guitar thinner than the rest. If you do everything according to the rules, then one blank needs to be made longer in the neck area.

We glue the guitar box together with tape. Cover the entire surface with chocolate wrappers. The base is ready. Now we glue the chocolates themselves on top of the wrappers; it is not necessary to use a kinder, you can take any candies with a flat base. You need to pave it as tightly as possible, but even if there are gaps left, this is not critical, since we previously covered the surface with wraps, they will be almost invisible. To make it look more like a real instrument, we stretch strings from thick threads. Having mastered this simple technique, you can make a model of any instrument and design it individually for your sweet tooth.
How to make a birthday gift with your own hands
Let's finish with sweets for today. Now let's look at how to arrange beautiful DIY birthday gift for parents of a newborn. I think that a bottle of champagne would be quite appropriate, and if it is decorated in accordance with the event, it will become an excellent souvenir. There are many ways to decorate, you can sew an outfit, or wrap it in beautiful paper, but we use the decoupage technique for decoration.
Before working, you need to remove the labels from the bottle; to do this, soak it in cold water for a while. Then remove the labels, the top one can be left, and the remaining glue can be easily removed with cotton wool and alcohol.

Now we tightly cover the entire glass surface of the bottle with white acrylic paint. It is convenient to work with a piece of sponge. When the paint is completely dry, apply one or two more layers so that the bottle does not show through. Choose a design that suits the occasion, I have a napkin with a stork, but you can choose any other, the main thing is that the design is suitable for congratulating a newborn. We don't need the whole napkin; cut out the necessary fragment. Next, we proceed directly to decoupage - there are several ways to glue a napkin to a surface. With the “dry method”, the place where the napkin will later be glued is coated with acrylic varnish, left to dry a little, but not completely. Place a fragment of a napkin on top of the half-dried varnish and carefully, slowly smooth it out from the center to the edges. Apply another layer of varnish on top. To prevent the edges of the napkin from being visible, the remaining unsealed surface of the bottle needs to be decorated in a tone; for me it is pink, so I add a drop of red color to the white acrylic paint. Using a piece of sponge, apply paint over all surfaces, slightly extending to the edges of the napkin. When the paint dries, fix everything with a layer of varnish. If after the varnish has dried, wrinkles or roughness have formed on the bottle, they can be easily removed using fine sandpaper. I have white circles on my napkin, so to make the background the same, I use a white acrylic outline to draw droplets on the surface of the bottle.

To highlight the design, outline it with acrylic paint with a pearl effect. The drawing will be beautifully framed; to do this, take openwork lace, spread a layer of varnish along the contour of the bottle, and do the same with lace. There is enough varnish to keep the lace firmly, the main thing is to let it dry thoroughly. When the lace is dry, you can tint it with paint. We put dots or draw a pattern along the contour of the foil with a pearl outline, and finally cover the entire composition with another layer of varnish. Instead of a regular postcard, we cut out a small label from scrap paper with curly scissors, write all our wishes and congratulations on it, and attach it to the neck of the bottle using a satin ribbon.

Thus, we designed a gift for the parents of a newborn; if you want to decorate the bottle for another occasion, the decoupage technique is perfect, the only nuance is in the motif of the picture. In any case, when making gifts with your own hands, you put a piece of your soul into the gift. A gift should be not only beautiful, but also useful, so we often give money; you can learn how to decorate a gift envelope from ours.
Choosing a suitable gift for a birthday or any other holiday for some people becomes a real torture, but for others it can be a great chance to show yourself and care for a loved one or just someone you like. When choosing a gift, pay attention to the following questions:
- Who is this gift for? What is your relationship with the birthday boy?
- What is closest to this person's liking?
- How will the celebration take place? What time of year?
- What do you want to achieve from the gift? Surprise? Nice to impress?
There is a difference between gifts that simply show care and good attitude (suitable for a grandmother or friend) and those that are intended to take the relationship to a new level or touch (if it is about a loved one).
If you are new to the world of ideas for congratulations or, on the contrary, tired of the “gift routine,” pay attention to homemade gifts. This can be a completely original project of your invention, where every detail is made by your own hands, or purchased items, but decorated in a cool and fun way in order to enhance the impression of the gift and make it more interesting.
A handmade postcard can be a wonderful gift; it will be pleasant both.
 Many who hear about handmade gifts begin to complain about their sloppiness and look for excuses in the fact that they have never done “real needlework” or painting pictures. But it doesn’t take a lot of effort or knowledge to make a truly impressive and respectable gift. If you are good at crafts and drawing, this is only a big plus and a wide range of possible ideas. But even if you have never tried to do something like this and have no idea about your capabilities, there are many interesting projects and ideas for you that do not require special skills and technology.
Materials for most heartfelt gifts can also be found on hand. You will be surprised if you find out how many unnecessary old things you throw away can be used to find details that will become a transformed part of a beautiful composition.
Cool gifts made of paper or cardboard
Gifts made of paper or cardboard are a classic option that can come in many variations. The beauty of these materials is that they are easy to find in stores., especially since there are many beautiful types of various colored and decorated paper and cardboard - depending on your design. The price of paper and cardboard is quite reasonable, which makes it a truly universal material for gifts. But there are many options for use here: postcards, drawings, origami with messages and figurines of your favorite characters, original boxes, frames, romantic inscriptions or homemade figures.
You can always make a romantic collage from paper with your common photos, which will delight you with pleasant memories. To do this, construct an “accordion” or a more complex geometric figure from paper, onto which you paste the necessary photos and decorations.


There are many schemes on the Internet with which you can make a three-dimensional card with an inscription or decorate a sheet of plain paper with decor. Give free rein to your imagination and turn an ordinary piece of paper into an interesting and beautiful gift.


The main highlight of such applications and signatures, as well as your crafts, is that you make this gift individual and one of a kind. No manufacturer can immortalize the favorite things and interests of your loved one with the help of applications and drawings, or combine your common memories and pleasant emotions in images.
Gift from photos
You can also make an original gift from photographs. Skip the usual industrial frames - you can make them much more interesting with your own hands. Using cardboard, you can create a “tree” or a square on which small photos will be glued. They can also be hung by attaching them to colored ribbons or beaded pendants.
The photo can be arranged in the shape of a tree, flower or other symbol, connected with decorations on a large-format sheet.
Cool crocheted gifts or beaded gifts
If you know how to knit, then using this skill you can make unusual and original gifts that are not associated with standard products from patterns, such as scarves, socks or hats. For example, you can buy a standard-size cup and knit a “cover” for it, on which there will be a funny portrait of the birthday person or his name. This gift is well suited for a person born in winter or late autumn - it has a lot of warmth and care.


There are also patterns that allow you to make three-dimensional objects using knitting or toys. Think about what animals this person likes, whether he has any special preferences among book or cartoon characters. A related favorite character from childhood will help touch almost anyone.
Beads allow you to create not only decorations or images, but also many shapes, funny characters or figures, where thin wire instead of thread is used as a basis. This way you can create a tree to which small photos, candies or decorations are attached. Such a gift will be not only beautiful, but also interesting.
However, such techniques require special schemes and skills. If you have never weaved with beads before, you can use this material as decoration, creating the desired contours or shapes using glue and the base material on which the beaded form is already laid out.
Flowers are a traditional gift for beloved women, mothers and grandmothers. Flowers are often given in spring and summer, symbolizing the beauty and victory of a blooming life. On birthdays, flowers are given, emphasizing the sophistication and beauty of their owner. But it’s much more original to create flowers from a different material or make a similar gift with your own hands.


These can be origami lilies or other flowers made of thick paper, inside of which you can hide a pleasant congratulation and message or an interesting little thing. It’s easy to make roses from paper for decoration from separate round sheets, collecting them around the “core” so that they look like a rose. To create flowers, they often use crumpled paper or the “quilling” technique - creating shapes and images by twisting and gluing strips of paper.


When making an original card, you can attach “flowers” made of fabric, beads, thick threads or any other materials to it. The beauty of the flower as a form is that it is universal and recognizable, so you can easily find material for your idea.
Cool gift made from money with your own hands
Money is a traditional and “tested” gift. If you don’t fully know all the person’s preferences or want to be more practical, give money. But still, although this gift is useful, it does not always bring the expected joy. Firstly, many people use the donated money for something everyday or regret spending it on a rarer gift to “pamper” themselves. It often happens that the birthday person himself does not fully know what gift would suit him. Well, the second good reason: the money itself in a white envelope is a little boring and too “official”. If you want to make them more pleasant and interesting, frame the money in an interesting story or put it in a homemade box.


Money can be presented in the form of a story, where they list what it is recommended to spend it on (in a comic form). Or they can be placed in a neat and interesting enticing box, where a separate letter sets out their history and “adventure”: how they were passed from hand to hand.
Less creatively, money can be designed as part of a postcard, where their presentation will be interesting graphically: stretched out from the character’s hand or inserted into a separate frame, they will immediately take on a cool look.
Many people have a special relationship with sweets. Some people have to limit themselves in their quantity, so every chance to eat a long-awaited sweet turns into a special pleasure. Others because of the pleasant and incomparable taste, to which many of us are susceptible. A gift of sweets is associated with joy and pleasure, and scientists have proven that dark chocolate and bananas improve mood and bring joy.


But candy or chocolate compositions themselves are a tasty, but uninteresting gift. If you want to truly surprise a friend or relative, approach the task creatively and make a sweet gift with your own hands.
Lately, bouquets and arrangements of sweets have become especially popular. where instead of flowers they are given interesting shapes, decorated and embellished. You yourself can give the sweets different shapes depending on the gift you choose.


Using an ordinary jar and a beautifully decorated lid, you can create a special sweet gift. Decorate the jar, paint it with permanent markers or cover it with whole coffee beans (glitter, rhinestones). Label it “Cure for Sadness” or “For Joyful Moments” and fill it with various candies or lollipops. Signatures can also be: “For the sweetest person,” “Sweet pleasures of life.”


The same idea can be presented in the form of an album, on the pages of which you can glue wrapped goodies, signing what event they are intended for. The more personality and creativity you put into this gift, the better.
As a result, we can say that the main value of a gift is your efforts and feelings that you put into it. Beautiful techniques of weaving patterns from beads, frames decorated with shells or coffee beans impress with their beauty and seem cute, but gifts in which feelings and individuality are invested are much more valued. The very meaning of a gift is in the attention and emotions invested in it. Cool and funny gifts are often those that highlight your common experiences, memories and especially the individual characteristics of the birthday person. Show that you value his character and hobbies, as well as your relationship, and express this with your own hands - the result will be as good as possible.


