Crochet headband for women, girls. Models with knitting descriptions. We knit beautiful and fashionable crochet headbands Crochet headband for sports
I've always noticed how cute little girls look with bright colorful headbands covering their ears. In stores you can find a huge variety of headbands for young fashionistas. And mothers are not far behind. They knit wide multi-colored elastic bands with ribbons, beads or flowers for their beauties. However, girls and women have completely forgotten about this once fashionable accessory. But why? This headdress is perfect for warm windy weather, when it will be a little hot in the hat, but you really want to cover your ears.
Why not bring headbands back into our wardrobe? Unusual modern products can decorate any haircut and will be an excellent addition to a spring or autumn look. In my master class, I would like to tell you how you can knit an interesting headband that will compete with berets and hats. In addition, this accessory can be made in 1 day. For knitting I will need: hook No. 4.5 and acrylic threads + wool. I used thicker yarn so that the headband could be worn in cool weather.
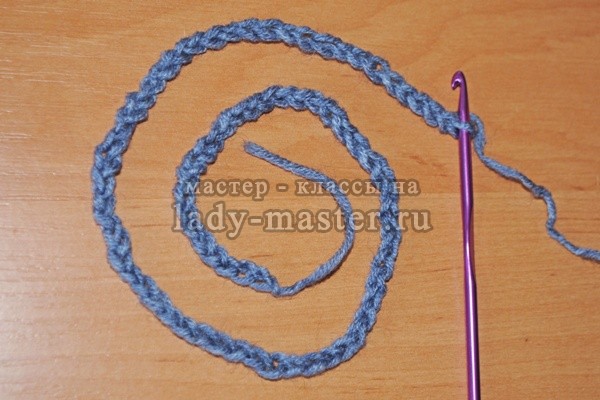
1. First, I cast on a chain of air loops that will correspond to the circumference of the head. I try it on myself. A chain of 89 loops suited me. Please note that their number must be odd.
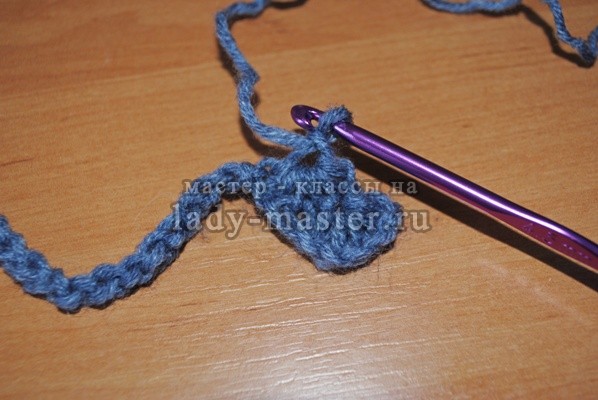
2. The bandage is knitted in straight and reverse rows. I start the first row (front side) by casting on 5 new loops on the hook. Starting from the second chain loop after the hook, I pull the thread out of the 5 loops of the braid. This is done according to the principle of making unfinished single crochets: I insert the hook into a loop of the chain, pull out the thread, two loops are formed on the hook, but I don’t finish the stitch further, that is, I don’t tie these loops together, but leave them on the hook and move on to the next loop of the chain.

3. When there are 6 loops on the hook, I yarn over and pull it through all 6 loops. I knit a chain stitch so that a hole is formed above the 6 loops.

4. Again I put 6 loops on the hook, but I perform this action as follows: I pull 1 loop from the hole, 1 loop from the last of 6 loops, 1 loop from the air loop into which the last of 6 loops was cast and 1 stitch from the next 2 chain stitches. Total 6 loops on the hook.

5. I put the thread on the hook and pull it through all 6 loops, completing the element with 1 chain loop.
6. According to the pattern described in points 4 and 5, I knit the row to the end. In the last chain stitch I perform 1 half double crochet and turn the work over.

7. I knit the second row (wrong side) like this: 2 chain stitches, 2 half double crochets in the hole of each element. I finish the row with 1 half double crochet in the last loop. I'm turning the job around.
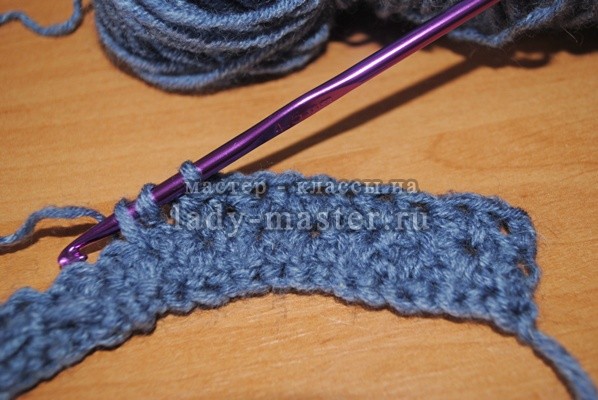
8. In the first row I got 44 “stars” and 2 half double crochets in each hole.

9. I knit the third row (front side) according to the principle of the first. I cast on 3 chain loops, pull out 1 loop from the 2nd and 3rd chain loops from the hook, then 3 loops from the first 3 loops of the row. Total 6 loops on the hook. I yarn over, pull the thread through all 6 loops and finish the element with a chain loop.

10. I knit the remaining stars to the end of the row according to this pattern: I pull 1 loop from the hole, 1 loop from the last of 6 loops, 1 loop from the same loop into which the 6th loop was cast and 1 loop each from the next 2 columns of the previous row. There are 6 loops on the hook.

11. Yarn over, pull the thread through all 6 loops and make a chain loop.

12. Having completed the row, I make 1 half double crochet in the last loop and turn the work over. Next, we knit purl rows following the example of points 4, 5, 6 and knit rows in accordance with points 9, 10, 11,12.

13. We complete the product with a purl row. The number of rows will depend on the desired width of the bandage. I made 8 rows.

Every parent wants to protect and embellish their child. One of the accessories that fulfills both of these conditions simultaneously is a headband. It can protect your child in inclement weather and serve as a nice decoration.
Models
Bandages may vary in width. Some models are very narrow. But there are also those that can cover the child’s head completely, leaving only room for hair to come out.


Narrow ones can be worn to complement the baby’s look. If you are going for a walk on a warm summer day or planning a photo shoot, then this is the most suitable option.


Those that are three centimeters and wider will be relevant in cool weather in spring or autumn, or suitable on a windy summer day.


Headbands wider than six centimeters are a great addition to a wardrobe in colder weather for older children. Or they can be worn under a hat.


Color spectrum
Nowadays, the color palette of things is extremely diverse; many shades combine perfectly with each other and create stylish and luxurious combinations.
Thanks to this, you can have several headbands available that will perfectly match your child’s entire wardrobe. After all, children also want to look stylish.

For spring, when everything is just blooming, delicate colors will be an excellent choice. These include pink, mint, lilac, blue.
Closer to summer, when the sun pleases all living things around, it is better to choose a brighter palette. Rich and colorful colors would be ideal. Red, green, blue, yellow - exactly what will be needed at this time of year.


With your own hands
Binding such an attribute is quite simple. All you need is a skein of yarn. Preference should be given to cotton raw materials. You also need a 3 mm hook - small, an elastic band (preferably matching the yarn) and a sewing needle.

First you need to cast on air loops. You need seven of them. If you want to get a wider final product, you can dial nine. The cast-on loops will form the basis for the future product. We will attach them to the prepared elastic band.

Next, make one air loop and insert the hook into the second stitch of the line. Having brought it under the elastic, you should grab the working thread and finish it. To make the elastic “wrapped” in loops, you need to repeat the action six (or increase the number by two if the selected width is nine) times, resulting in seven (or nine if the selected width is nine) stitches.
To “build up”, you should cast on three lifting loops and knit them with overlapping stitches into the corresponding stitch from the previous row. Then cast on three lifting loops again and knit a stitch, throwing it into the space with the previous one. Repeat, finishing the row.
Continue picking up lifting loops until you reach the optimal length. When finished, secure the end of the bandage.


Decor
If you wish, you can add some decoration, such as a fabric flower, that will not disturb the child. It won't be difficult to do it. All you need is a piece of fabric no more than 10 centimeters long that matches the bandage or matches it, thread and a needle.
To make the desired accessory, wrap the fabric in a circle, increasing the diameter towards the center, starting from either edge. Sew, securing with thread in the middle.
Your product is ready!

For older children, you can choose other decorations for the headband.
One option could be foamiran flower. Having just appeared, this material was widely used quite quickly. Due to its texture, it is often called plastic or faux suede. The diverse use of elements from it is very extensive today. Details for the headbands are made in the form of flowers, butterflies and hearts or combining them together.


The result is headbands that look very impressive and fashionable.

Jewelry made in Japanese treasury technique. This is the name given to jewelry made from satin ribbons; less commonly, wood, metals, or silk are used to create them. There are a huge number of ideas for creating them, which are readily used by those involved in creativity. These are mainly flowers of different colors and sizes. The tapes used to make them vary in width, color and texture. By combining them with each other, needlewomen get a variety of details for headbands.


Create the image of your child together, then you will both be happy with this process and the result.
A detailed guide to creating a headband is in the next video.
Video review of Pekhorka yarn "Crossbred Brazil"and the answer to the question:“What can you knit from Pekhorka yarn “Crossbred Brazil”?you can watch it by following the link:https://youtu.be/dFv0ubUmKdU
Yarn Pekhorka "Crossbred Brazil".
Composition: 50% merino wool, 50% acrylic
Meter: 100 gr. 500 mt.
Packaging: 5 skeins of 100 gr.
The yarn is easy to knit, the fabric is smooth, dense and durable. This is mainly a winter yarn: it makes excellent sweaters, jackets, socks, gloves, as well as the “endless scarf” that is popular today - snood. Excellent yarn, soft and pleasant. The weave is associated with a cascade of small beads, which also emphasizes its individuality, is very much in demand, that is, it has won the recognition and love of knitters, thanks to its impeccable quality and softness. Manufacturers recommend knitting needles No. 2.5-3 and hook No. 3. On a knitted pattern 10 by 10 cm, 40 rows of 30 loops are obtained.


You can buy and order yarn and craft supplies here:
In the OK group:
A headband with a hook is an original and extremely versatile wardrobe item. It can be made of cotton and worn in the summer as a decoration, or you can take woolen material, then you won’t be afraid to go to the skating rink in not very severe frosts. The headband will look magical on both newborn babies and older girls, and will perfectly complete the romantic image of a modern woman.
How to properly crochet a headband for a girl

This style of headband for a girl can be made either casually from acrylic or wool yarn depending on the season of the year, or formally, for example, from cotton (and it is better to take light shades).
Prepare the necessary materials: a needle and thread, a centimeter, decorative elements (rhinestones, sequins, buttons, beads), a ruler, a hook (select the number according to the thickness of the threads used) and, of course, skeins of yarn.
Let's move on to the master class:
- Take measurements. Use a centimeter to calculate your head circumference. This will be the length of the product. The width is according to your wishes. For example, in children under one year old it is usually 33-35 cm.
- Make a test sample to see if the pattern and dimensions are suitable.
- Next, you can use one of two common methods. The first one is almost simple and is well suited for beginners. It is called longitudinal knitting and is advantageous in that the item is seamless.
- Longitudinal knitting: cast on a chain of air loops, making its length according to the just measured circumference of the head. You can also calculate it using the sample. To do this, multiply the number of loops by 1 cm by the size of the head circumference. Remember that the chain must be a multiple of the repeat of 9 loops. Loop the chain and continue knitting until the 5th row. And the next 5 need to be mirrored.
Warm headband for women made of lush columns.

Materials:
Hook No. 3, 5; 50–60 grams of Alize Cashmere Batik yarn (100% wool, 100 g/300 m).
Make the upper and lower parts in lush columns according to the scheme:

The middle will consist of five rows of relief columns. You do the tying with a “crawfish step”.
Lush columns:
- You dial the chain, close it. The first row is made of single crochets.
- Second row: three lifting stitches, skip the base loop, make one double crochet, 1 double crochet, knit over the skipped stitch, repeat everything except the first 3 stitches.
- The third is the same, but in the opposite direction.
- From the 4th to the 8th row, perform relief columns.
- The 9th is similar to the second.
- The 10th row is like the third.
You can, of course, knit it entirely from lush ones, but this will increase consumables. And if you alternate in a circle with turning rows, you will get all kinds of patterns.
Let's look at a master class on a bandage for a newborn girl
A headband for a newborn will make her look as tender, fragile and innocent as possible. It is so beautiful!
You will need: white and pink yarn; a bead to decorate a rosette; hook number 1.
First you need to measure the circumference of your head; it will be equal to the length of the chain of air loops. The first row is knitted using single crochets. At the end of it, make three lifting air loops.
Second: one double crochet in the third loop from the hook, two chain crochets, a double crochet in the third loop from the original. Repeat until the end, and then add an air loop.
Third row: in the same way with single crochets. You break away from the pink thread and start working with the white one.
Fourth: three chain loops, one half-stitch in the second loop from the hook, three chain stitches again, a half-stitch in the second loop from the original one. Repeat until the end.
Fifth row: knit five single crochets into the first arch in the previous row, one single crochet into the next arch in the fourth. Do this until the end, and then attach the thread to the second edge of the bandage. The opposite one is knitted as the first one (from the 4th to the 5th row). You should get something like this:

Now you need to connect both ends of the bandage with half-columns or just fasten it with a seam.
Now the rose.
First row: thirty chain stitches, then turn the chain inside out.
Second: three air lifting loops, one double crochet in the fourth loop from the hook, chain crochet, one double crochet in the same stitch as the first stitch, one double crochet in the third loop from the hook, chain crochet, one double crochet in the same loop. The result is a chain with V-shaped patterns.
Third row: three chain stitches, place 8 double crochets between the posts of the V-shaped pattern. Do all of the above to the end.
Twist the finished chain in a spiral and secure the ends with threads. Sew a pink or white bead into the middle.
Attach a rosette to the seam of the ends of the headband. Insert an elastic band into the free spaces between the second and fourth rows. Ready!

Video on the topic of the article
Especially for you, we have collected interesting and creative video clips that will definitely help you quickly decide on your future creation. Knit and wear with pleasure!
A headband crocheted can be a successful addition to your look. It can be worn as a separate accessory or to keep your ears warm in cold weather. A set made in the same style - scarf, headband and mittens - will look good.
Such a product can be made even for the smallest fashionistas, who will definitely appreciate the item. A knitted headband can be knitted with fabric of a certain length and then simply carefully sew the edges, or you can immediately knit it in the round.
Crochet headbands: a simple option
Crochet 10 chain stitches. If desired, you can increase or decrease their number. But keep in mind that the more loops you cast on, the wider the bandage will be. Knit all the loops with double crochets. And at the beginning of each row, do not forget to cast on air loops for lifting. Work until you reach the desired length of the product, which should be measured around the circumference of the head. If in doubt, try it on from time to time.
To complete the work, cut the thread, pull the end through the remaining loop and tighten. Sew the edges of the headband together or tie two thin ties, you can also insert a ribbon or sew on a button.
Crochet headbands in the round

Crochet a chain of air loops. Its length is calculated by the circumference of the head plus the lifting loops. Having connected the edges of the chain, continue to knit the headband in a circle with stitches along with the crochet. The width of the future product depends on how many rows you knit. At the end of the work, tighten the last loop and cut the thread.
This method differs from the first in that the bandage is knitted completely and at the end there is no need to make a seam to connect the edges. However, this requires skill in crocheting in the round.
Crochet headband: patterns
Knitted headband with decor
In order to knit such a simple but very interesting headband you will need: yarn, hook 2, thread and needle, decorative items.

- First, you should cast on five air loops and one edge loop, then continue to work on the remaining loops. A 50 cm headband requires 206 loops.
- The first stitches must be double crochet.
- When you have knitted all the chain stitches, go to the other side and knit single crochets, which will make the pattern much easier to complete.
- Then start knitting a fan by knitting the first single crochet, then skip one stitch, and then knit 4 stitches with one single crochet, skip the loop again and perform 1 single crochet. In the future, knitting is done in exactly the same way.
- When you have tied the entire length of the bandage, you will need to connect its two ends, and then bring the knots to the front side. Don't worry about what doesn't turn out very nicely, because later it can all be covered with some decorative element, such as a beaded decoration. The ends of the bandage can be secured with fishing line or thread.
- Decorate the headband as you wish. You can use large beads, rhinestones and bead crafts. The bandage is ready!
Openwork headband

- Let's try to knit a headband in the form of an openwork fabric. To do this, we will use the diagram.


- The length of the knitted bandage should be approximately 10 cm less than the circumference of the head. Determine the width yourself.
- After knitting the bandage to the required length, tie it around the perimeter in a “crawfish step”. The cross step is a finishing element in which the knitting goes backwards along the front side of the product from left to right. As a result, you will get a straight canvas. Now, so that the headband fits tightly on the head, pick up a chain with air loops approximately 10-14 cm long, complete the ring and start knitting the pipe in stitches, without making a crochet, continue knitting until the missing 10 cm of the product. Pass the “pipe” through the bandage, and sew the ends of the bandage to the elastic yourself or using a sewing machine.

- Place the knitted “pipe” in place of the elastic band and sew it with hidden stitches. Look at your product, if you are satisfied with it, then the bandage is ready.
- For decoration, you can knit poppies according to the pattern. Gather the bouquet and secure the bases for the brooch. All imperfections and irregularities can be hidden under a knitted circle.
Crochet headband for girl
To crochet such a wonderful headband for a girl, you will need: crochet hook 2 and melange threads, it is best to choose Diva Batik Design 3241.


The headband for a girl is knitted in exactly the same way as the “Headband with Decor”, but it is better to decorate it in a slightly different way. Since this headband is intended for a girl, some cute bright beaded flower would be perfect.

When the bandage is ready, connect the two ends and bring out the knots on the front side, which will then be covered with a beaded flower. The ends can be secured with fishing line stitches, and they will look like a whole fan.


Now we will do beaded flower. To do this, put three beads on the fishing line and make a loop, you get one stamen. Then put six large beads on the fishing line and place them so that the stamen is in the middle. Place the end of the thread into the first bead, and then fasten the ring of beads on the opposite side. Drag the needle through the beads, pick up five beads, and make a loop. The beads should lie in an even arc. Repeat this with each bead until the flower is ready.


Pull the line to the middle, where two fans on each side create the center. Attach the bead here. Then put 9 beads on the fishing line and make an arc that will surround the bead. Insert the needle into the first bead to make a circle. Secure such a beaded circle on the opposite side from the first and last beads, this way the circle will hold better. Make fans in each center in the same way. That's all, the crocheted headband for the girl is ready.


Crochet headbands are a very interesting and stylish thing. She will definitely make you and your child stand out from the gray crowd!


